In tenkara fishing, the line is part of the casting system. It affects casting feel, fly turnover, presentation, sensitivity, and control.
At a high level, tenkara lines can be understood in three ways:
Shape — level or tapered Construction — single strand, furled, twisted, braided, or coated Material — fluorocarbon, nylon, PVC, or fiber
These ideas are often mixed together, but they are not the same. Level and tapered describe the shape. Furled, twisted, braided, and coated describe how the line is built. The material describes how the line behaves.
Level Line
A level line has the same diameter from one end to the other.
It is simple, clean, and easy to adjust. Most modern tenkara level lines are made from fluorocarbon. They give a direct feeling and are easier to keep off the water.
The tradeoff is that level line requires better casting timing because it has no taper to help turn over the fly.
Concept: Level line = simple, adjustable, and direct
Tapered Line
A tapered line changes diameter from one end to the other.
Usually, it is thicker near the rod and thinner near the fly. The thicker end carries more mass, while the thinner end helps the fly turn over and land softly.
The tradeoff is that tapered line is less adjustable. If you cut it, you may change how it casts.
Concept: Tapered line = smooth casting and easier turnover.
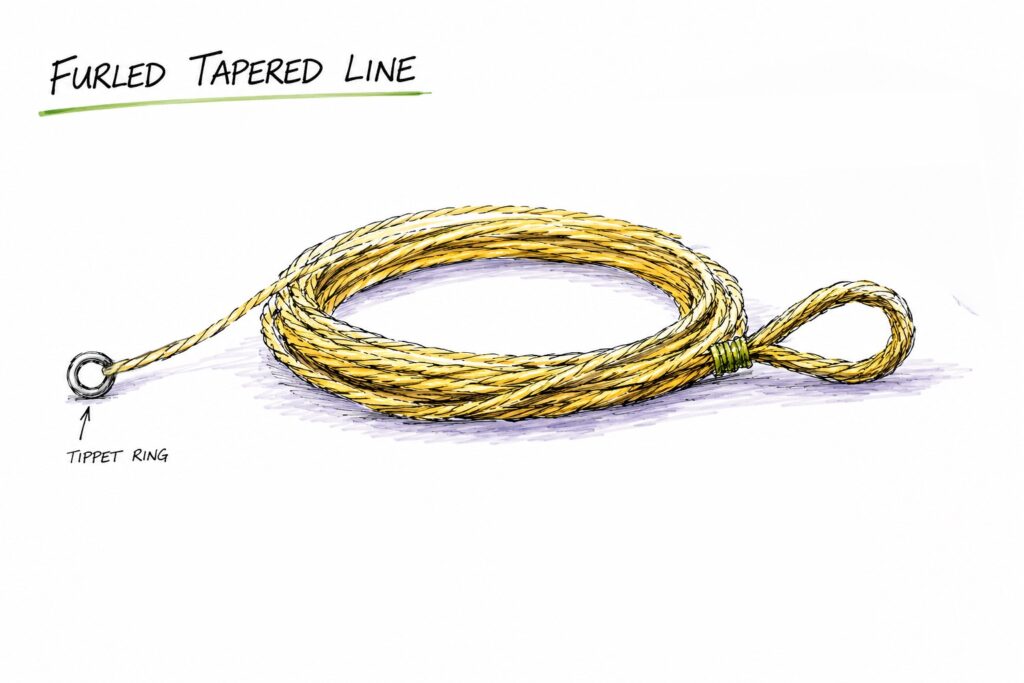
Furled Line
A furled line is made by combining multiple strands in a balanced twist.
Most tenkara furled lines are tapered, but “furled” describes construction, not only shape. Furled lines feel smooth, traditional, and elegant.
The tradeoff is that water, dirt, and silt can enter the small spaces between strands.
Concept: Furled line = smooth, traditional, and elegant.
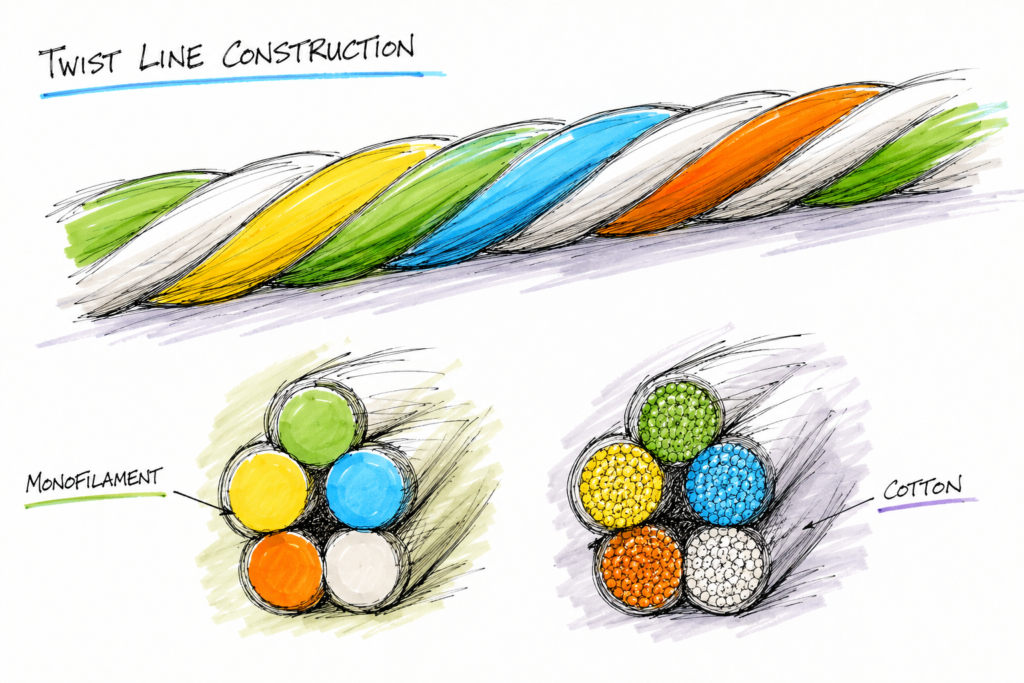
Twisted Line
A twisted line is made by twisting strands together, like a small rope.
It can be level if the same number of strands runs from end to end. It can also be tapered if the strand count changes.
Concept: Twisted line = rope-like construction that can be level or tapered.
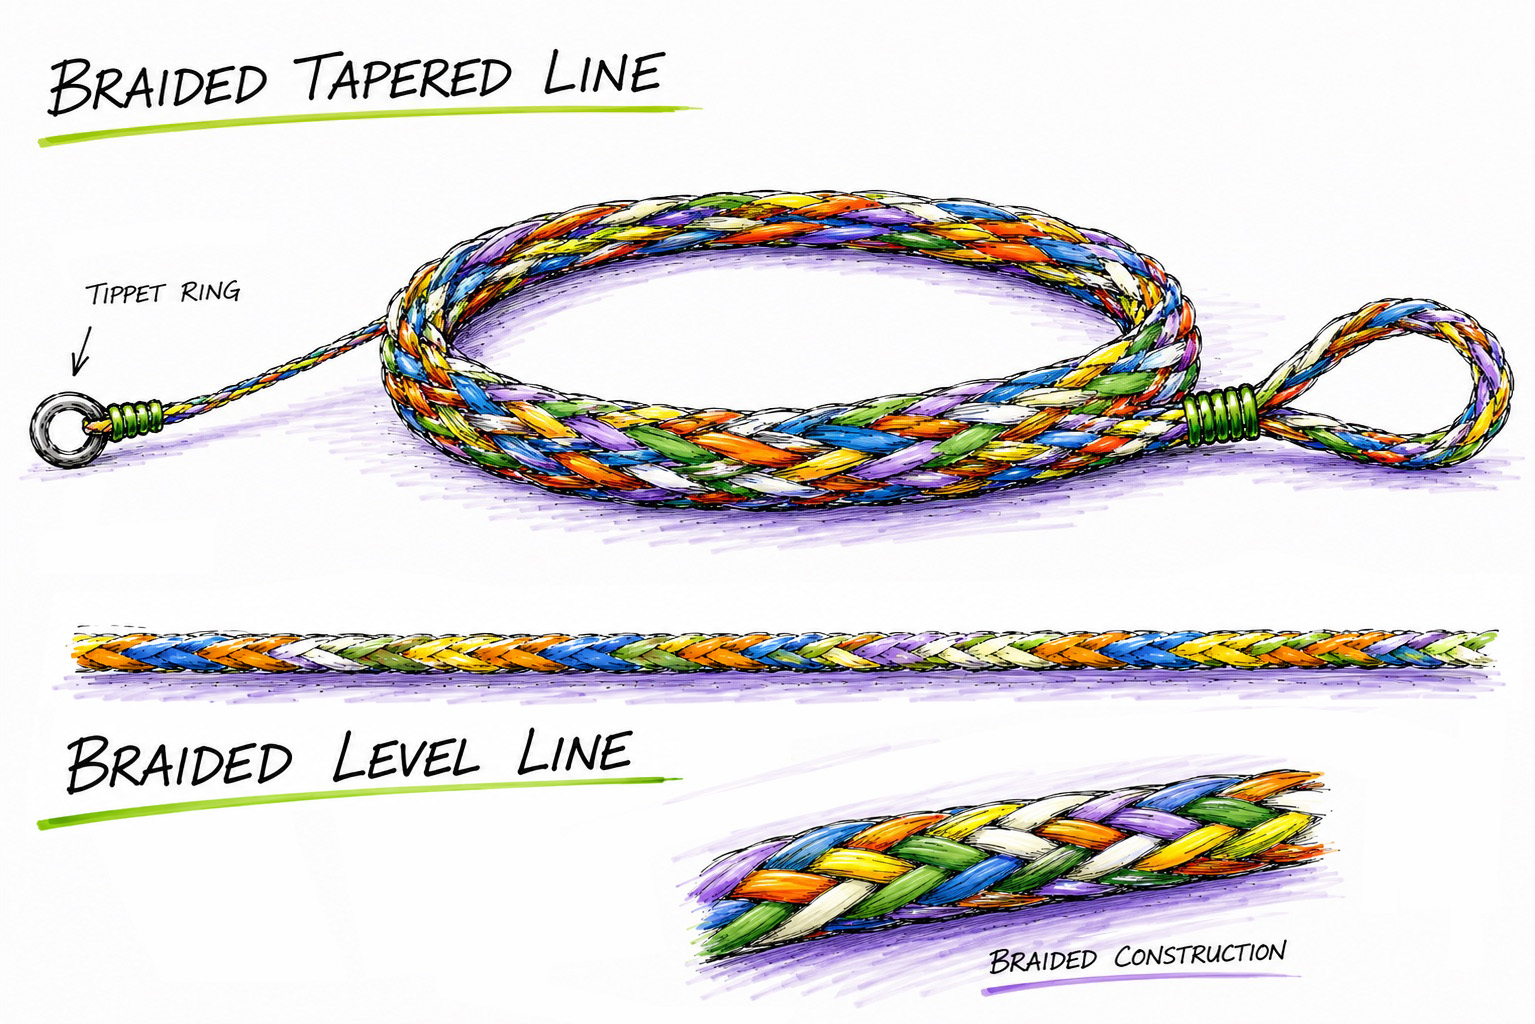
Braided Line
A braided line is made by interlacing many small fibers.
It is strong, durable, and inexpensive. But for tenkara casting, braided line can be too soft and too light. It may not transfer casting energy well unless it gains weight from water.
Concept: Braided line = strong and cheap, but often too soft and light.
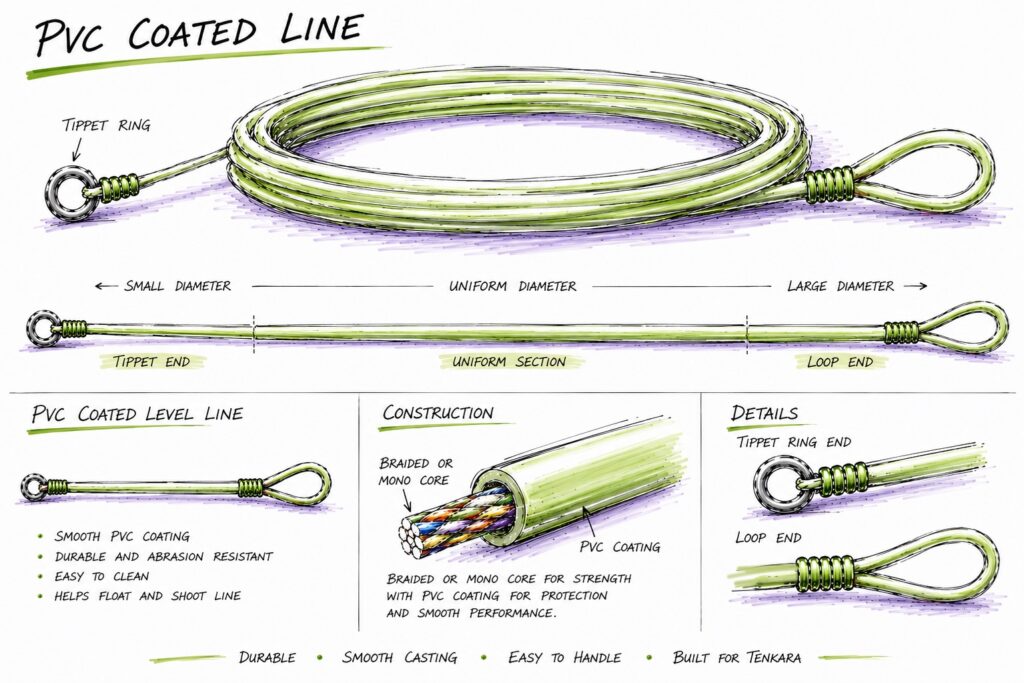
PVC-Coated Line
A PVC-coated line has a core inside and a coating outside.
The core can be solid monofilament or braided. The coating controls weight, diameter, and surface. PVC-coated lines can be level or tapered, floating or sinking.
Concept: PVC-coated line = waterproof, consistent, and controllable.
Fluorocarbon Line
Fluorocarbon is one of the most common modern tenkara level line materials.
It is dense, stiff, and sensitive. It transfers casting energy well and gives a direct connection. For nymphing, it helps transmit subtle vibration better than softer lines.
The tradeoff is that it has memory and sinks.
Concept: Fluorocarbon line = direct, sensitive, and good for control.
Simple Comparison
Line Type
Simple Idea
Level Line
Same diameter, simple and adjustable
Tapered Line
Thick to thin, smoother turnover
Furled Line
Multiple strands, smooth traditional feel
Twisted Line
Rope-like construction, can be level or tapered
Braided Line
Strong and cheap, but soft and light
PVC-Coated Line
Waterproof and consistent, can float or sink
Fluorocarbon Line
Stiff, sensitive, direct connection
Final Thought
There is no single perfect tenkara line. Each line is a different balance of shape, construction, material, weight, stiffness, and feel.
For example, a fluorocarbon level line often performs better when direct contact is important, such as nymphing, pocket water, and stealthy presentations. Its stiffness and sensitivity help transmit subtle movement and keep the angler connected to the fly.
In slower water, or when fishing with an indicator, a PVC-coated tapered line may have an advantage. It can be easier to see, easier to manage on the water, and can be designed to float or sink depending on the fishing style.
A tapered line also has an upper hand when casting bigger, bushier flies or when visibility is important. The extra mass near the rod helps turn the fly over more easily.
In the end, choosing a tenkara line is not about finding the “best” line. It is about choosing the right balance for the water, the fly, the rod, and the way you want to fish.
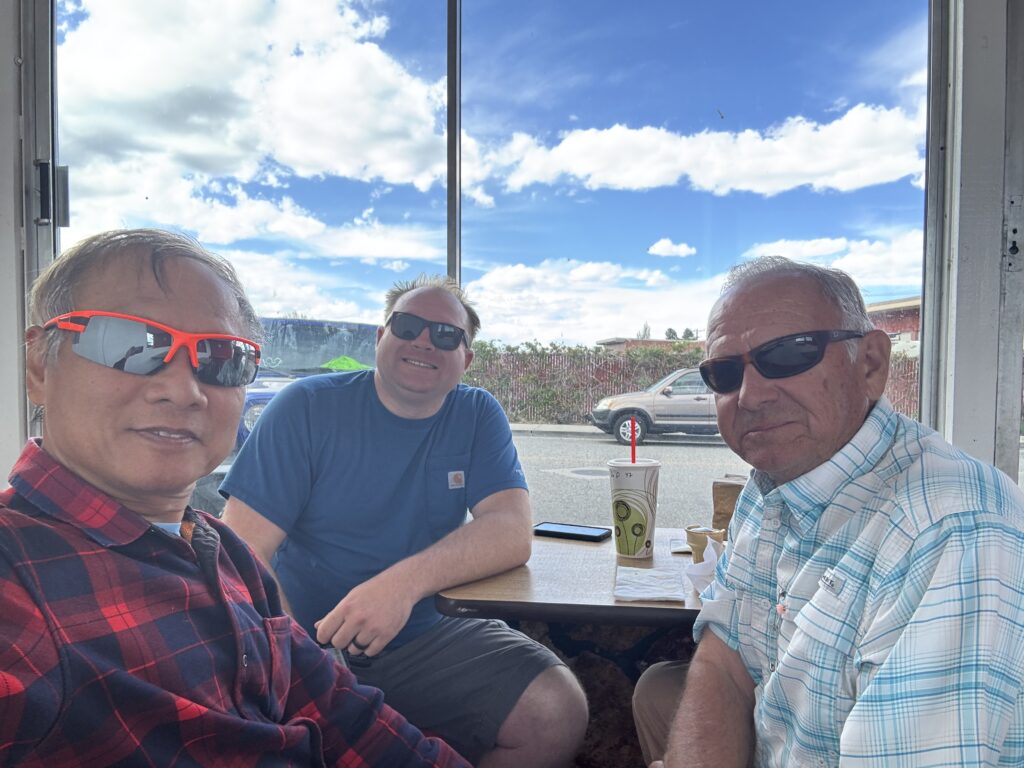
My friend Jon flew all the way from Toledo, Ohio, to join me for this trip.
Thomas Paulson also joined us. Tom is a local angler, a retired DFG warden, and one of those people who seems to know every piece of water in the Eastern Sierra.
Of course, he still says he never catches enough fish. 😂
On my best fishing day with Tom, if I am lucky, I might land about one-third of what he catches.
This trip was part fishing, part rod testing, part training, and part car shakedown. After spending almost $10K repairing my RAV4 and giving it a rebuilt engine that felt “100K miles younger,” I decided the car was ready for a real test drive.
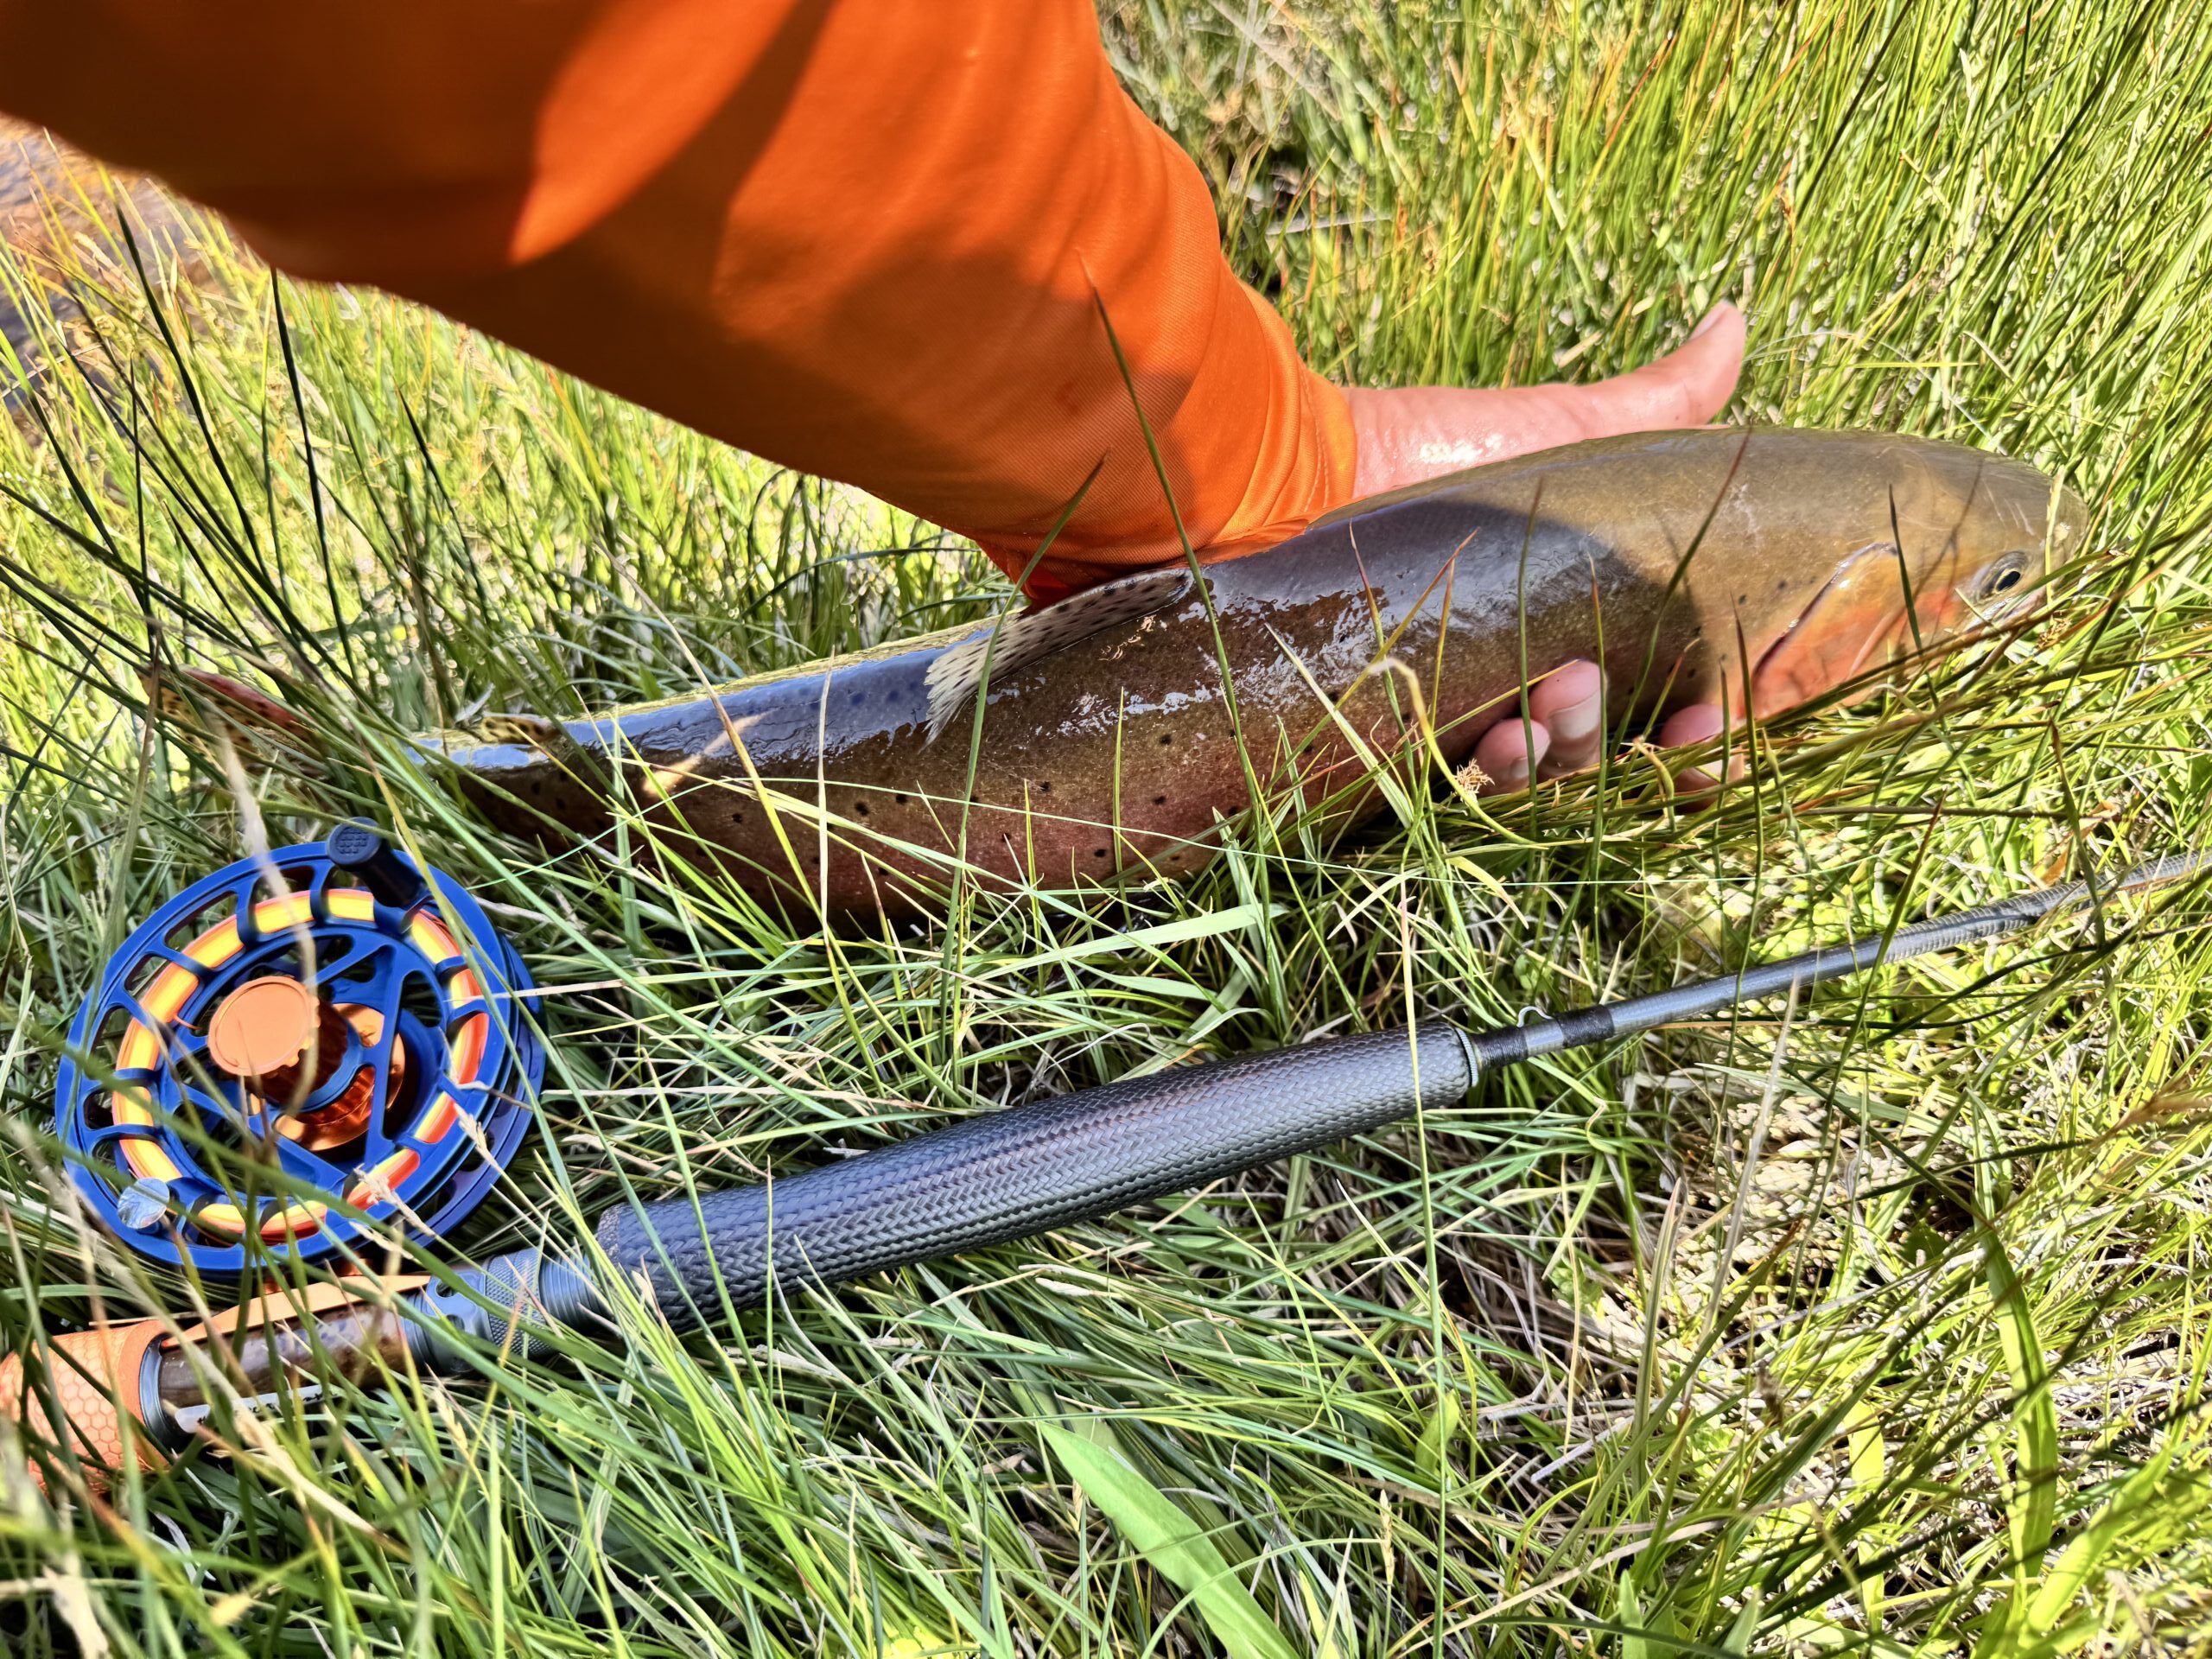
So were the Tanuki Euro nymphing rod prototype and a Tanuki reel prototype.
The Mission
The goals for this trip were clear.
First, I wanted to test the sensitivity and strength of the Tanuki 2-weight Euro nymphing rod prototype and the Tanuki reel prototype. Thomas had told me there might be a cutthroat run from the lake. If we were lucky, it would be a reel test.
To make the sensitivity test more honest, I removed all the sighter material and fished completely by feel.
No Indicator, No Sighter — Just Feel
Just rod, line, hand, and contact with the nymphs.
Second, I wanted more practice landing fish with a reel, especially bigger fish. With tenkara, I am very comfortable landing fish with the rod. But Euro nymphing brings a different challenge: bigger water, stronger runs, reel management, current pressure, and fine tippet protection.
I was also testing some new lines.
The mission was set.
Mono Cone, Pastrami Burger, and 300 Rainbows
On the way out of Yosemite, I met Thomas and Jon at Mono Cone in Lee Vining for a late 4 PM lunch.
If you love ice cream, Mono Cone is hard to beat. The burgers are good too. Tom suggested the pastrami burger, and it was totally awesome.
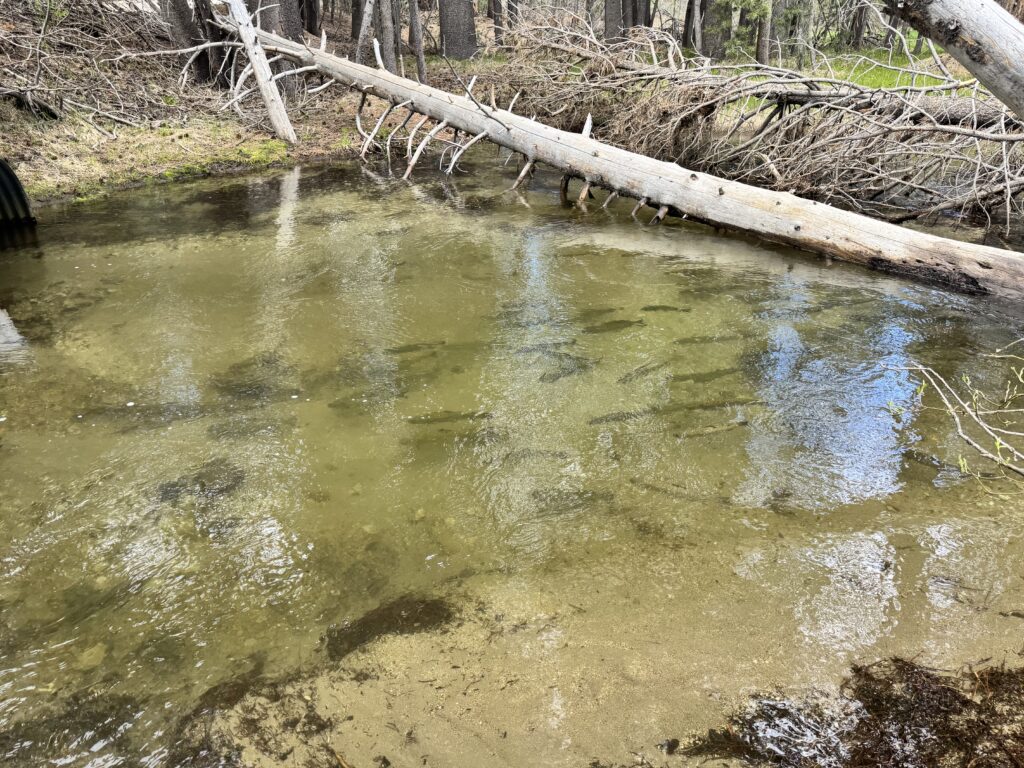
During lunch, I mentioned that I had seen a pool full of fish just outside the park entrance gate, about 15 minutes away. After lunch, we drove up to check it out.
Yes, there were fish.
A lot of fish.
About 300 good-sized rainbows were stacked in one small area, maybe 4 feet by 8 feet. It turned out to be a perfect place to test rod sensitivity.
I used a double-nymph rig. After a few casts, I felt the take.
These fish were about 14 to 16 inches. They were stocked fish, but once hooked, they ran like wild horses in every direction. Some went deep. Some shot downstream.
One fish really knew how to use the current. It ran downstream at least 100 feet, and suddenly the test became very real.
I had to chase it, control the rod angle, manage the reel, and figure out how to get close without breaking off.
That fish gave me exactly the kind of lesson I came for.
Fishing in an Aquarium — Until the Wind Arrived
The next day, Jon took me to another place that was so full of fish it felt like fishing in an aquarium.
I spent the whole day catching fish after fish.
Then the mountain wind showed up.
When the wind started kicking up close to 60 mph, I felt cold and shaky. Jon went back to the car and realized the temperature had dropped from 51 degrees to 40 degrees in less than two hours.
Luckily, the pine trees gave us some shelter, but it was still time to call it.
On the way back, the wind was still strong, and the power was out at the hotel. I was spacing out while checking my photos, but apparently my hand was still fishing. I could still feel the line vibration from a fish bite. Everyone cracked up. 😂
Classic mountain weather.
The next day was still too windy, so Jon and I decided to extend the stay one more day. We fished again with Thomas and started with a few bluegill. Then we headed back to the “aquarium,” which was more protected from the wind.
Once again, there were too many fish.
A terrible problem to have. 😂
Detour Stream and Big Cutthroat Lessons
Finally, on Tuesday, I started driving home.
small stream, catch and release only
On the way back, there was a car accident, and the police blocked the road. I took a detour onto a back road and found a small stream.
Of course, I had to stop.
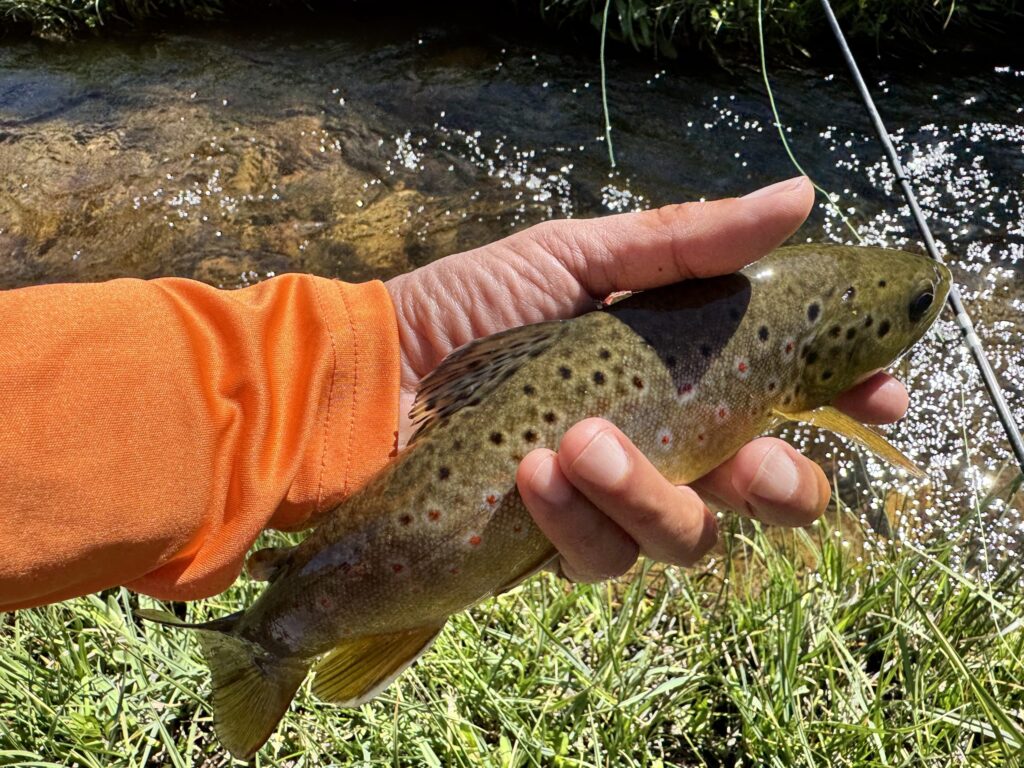
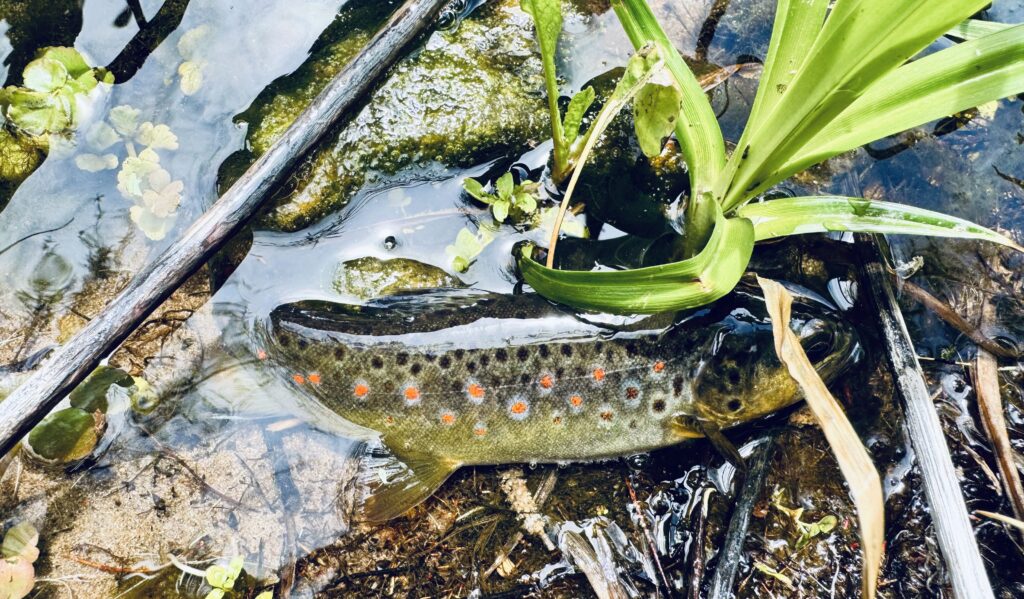
After about an hour, I caught my first brown trout, around 11 inches. Then I hooked an 18-inch cutthroat.
Momentum was on my side.
But fishing a Euro nymphing rod on a small stream is challenging. A Euro rod is not built for the same kind of precise casting I am used to with a tenkara rod. With tenkara, I can place the fly exactly where I want. With the Euro rod, I had to slow down and adjust.
Big fish like to hide under cut banks. Placing the nymph just a few inches from the bank was tricky because grass blocked the casting lane.
Finally, I figured out a method.
I cast as close to the bank as I could. If the nymph landed on the grass, I slowly and gently retrieved the line until the nymph dropped into the water. About 90% of the time, it worked.
That small adjustment made a big difference.
I also remembered something Gianluca told me when I was fishing in Slovenia:
“Slow down. The fish is always there. Take your time.”
That advice came back to me on this stream.
I am used to casting a tenkara rod with a faster, sharper stroke. With Euro nymphing, the cast needed to be slower. The more I slowed down, the more my accuracy improved, and the more control I felt.
On a small stream, I could not always use the current to keep line tension. If I poked my head too far over the water, the fish would see me and spook. Everything had to be slower, quieter, and more deliberate.
Then — bang.
I hooked a cutthroat around 20 inches.
The fish rocketed downstream. I followed it for about 30 seconds, but the line caught on a hanging tree root along the bank and broke off the tippet.
I re-rigged with a bigger fly.
Ten minutes later, I hooked another fish — at least 24 inches.
It made a strong run downstream. I was able to get close, but it broke off my 5X tippet. I had the fish’s nose out of the water, and I really wished I had a big net with a long handle.
That was the lesson.
I changed to 3X tippet.
That was the right decision.
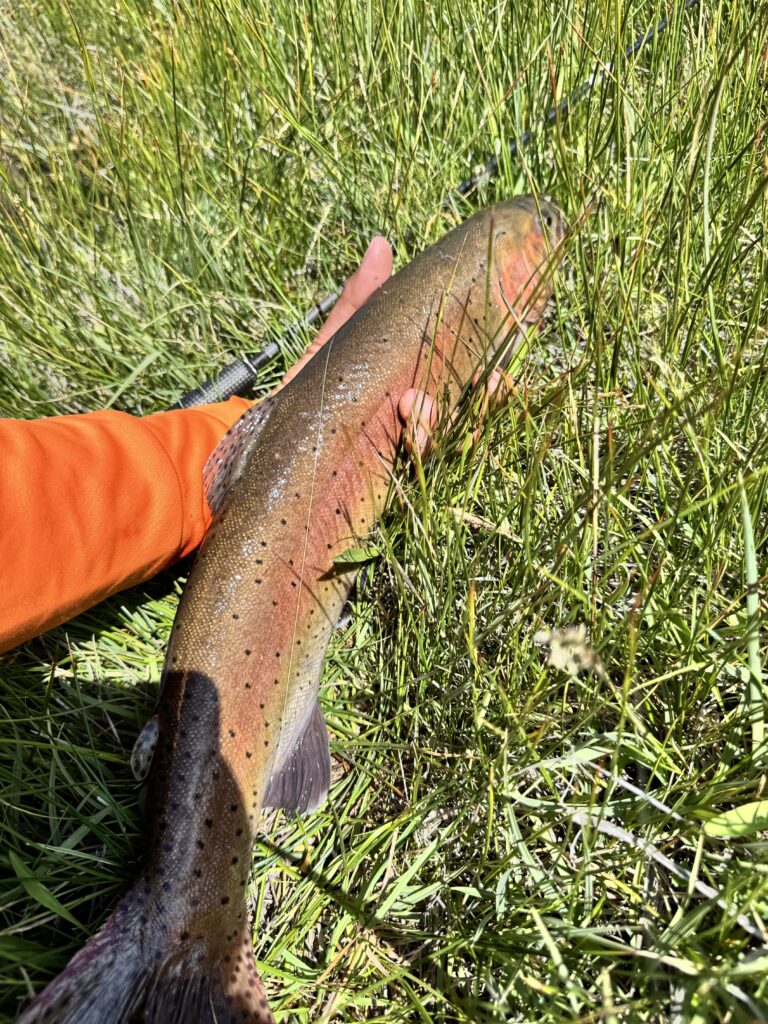
About ten minutes later, I hooked another big fish. This time, after a long run downstream, I landed it.
That was the moment I came for.
21 inches Lahontan Cutthroat
No Indicator, No Sighter — Just Feel
It was time to get back on the road, so I headed up and over the pass.
Once again, the fish were still there waiting for me. But this time, the place looked like a zoo, full of fly anglers.
I still managed to land about 10 fish in one hour.
The other anglers, fishing indicators, landed about two fish combined.
I showed them how effective it can be to fish without an indicator and without a sighter — just feeling the take through the rod, line, and hand.
For me, this is one of the most important parts of Euro nymphing.
The rod must transmit information.
The line must stay connected.
The hand must learn to read small changes in tension, pressure, vibration, and movement.
This is where rod sensitivity matters.
Tuolumne Brookies
Back on the road again, I saw the Tuolumne River and thought:
“Why not?”
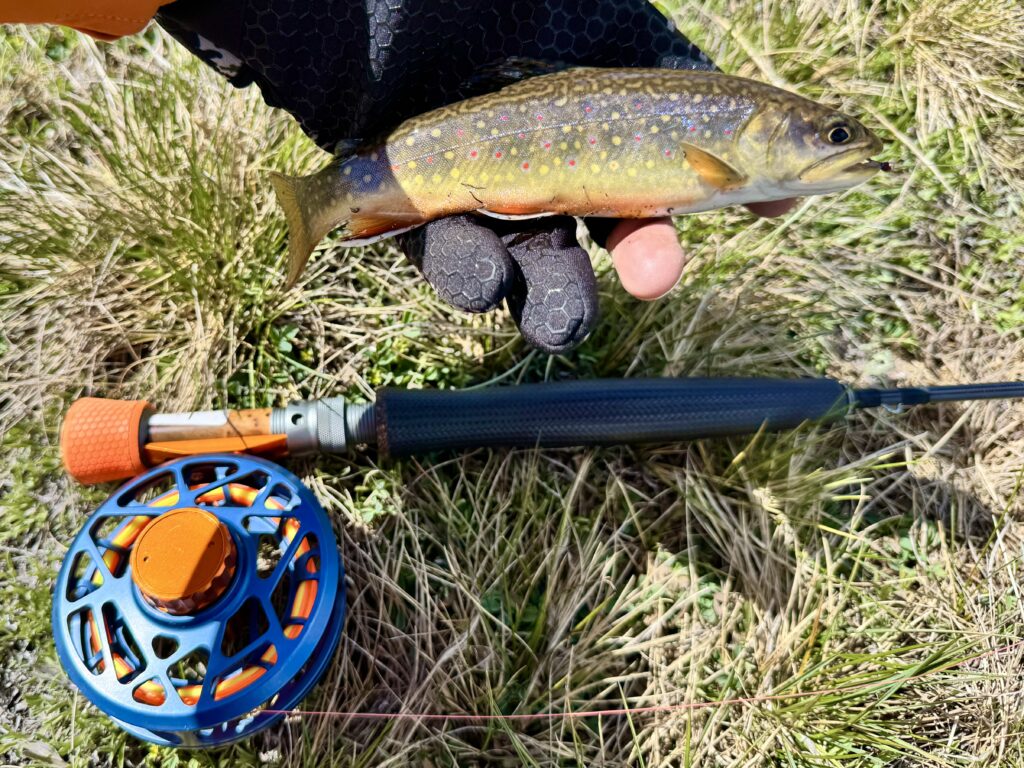
There are many brookies there, and sure enough, they were there — beautiful, spooky little brook trout.
Fishing them with a Euro nymphing rod was not easy. Any movement and they were gone.
I was lucky enough to land three.
But honestly, if I had used a long tenkara rod, that probably would have been thirty fish instead. 😂
What I Learned
I learned so much on this trip.
I am now more confident heading to Slovenia to chase monster marble trout with a Euro nymphing rod. Landing a big fish with fine tippet is not just about rod strength. Like tenkara, the key is not to horse the fish. Let the rod work. Let the fish calm down. Control the angle. Follow the fish when needed. Use the current instead of fighting it.
Reel Setting, Rod Tip, and Hook-Set Control
The reel is very important for protecting the tippet, especially when a fish suddenly turns into a turbo-charged rocket.
Before making the first cast, I always test the drag setting. The reel must release smoothly against sudden shock. If the drag is too tight, a hard run can break the tippet, or worse, overload the rod tip.
A Euro nymphing rod tip is hollow and sensitive. That sensitivity is what helps transmit small bites, but it also means I do not want to shock-load the tip with an aggressive hook set.
For Euro nymphing, I am learning to set the hook lighter. At the same time, I use my other hand to strip the line in. This gives me a safer and more controlled hook set.
If I miss the fish, the nymph does not come flying straight back at my face — or into a tree behind me. 😂
This trip taught me that landing bigger fish is not only about rod strength. It is about rod angle, pressure, footwork, current, reel control, and patience. Sometimes the best move is not to fight harder, but to follow the fish and let it run.
This trip gave me exactly what I needed: fish, wind, broken tippet, long runs, small-stream challenges, and real feedback from the rod.
Before comparing cork and carbon drag materials, we first need to define the problem.
A Euro nymphing reel is not designed around long-distance casting or stopping large saltwater fish. It is designed around contact, control, sensitivity, and fine-tippet protection.
Euro nymphing reels are usually used with thin lines, long leaders, and light tippets. The angler is often fishing close to direct contact with the flies, feeling subtle changes through the rod, line, and hand. In this style of fishing, everything matters: reel weight, spool balance, start-up inertia, drag smoothness, and how consistently the reel performs in wet and gritty conditions.
The reel also lives in a rough environment. It is used around water, sand, silt, gravel, mud, and streamside dirt. It may be handled with wet hands, placed on rocks, or exposed to fine particles that can work their way into mechanical parts. For this reason, a good Euro nymphing reel should be smooth, light, consistent, and well protected.
The main job of the drag is simple: protect the fine tippet and allow the fish to take line smoothly when needed. A sudden jump in resistance can break light tippet. A rough or inconsistent drag can reduce confidence when fighting fish. For Euro nymphing, the drag does not need to stop a tarpon, but it does need to start smoothly and remain predictable.
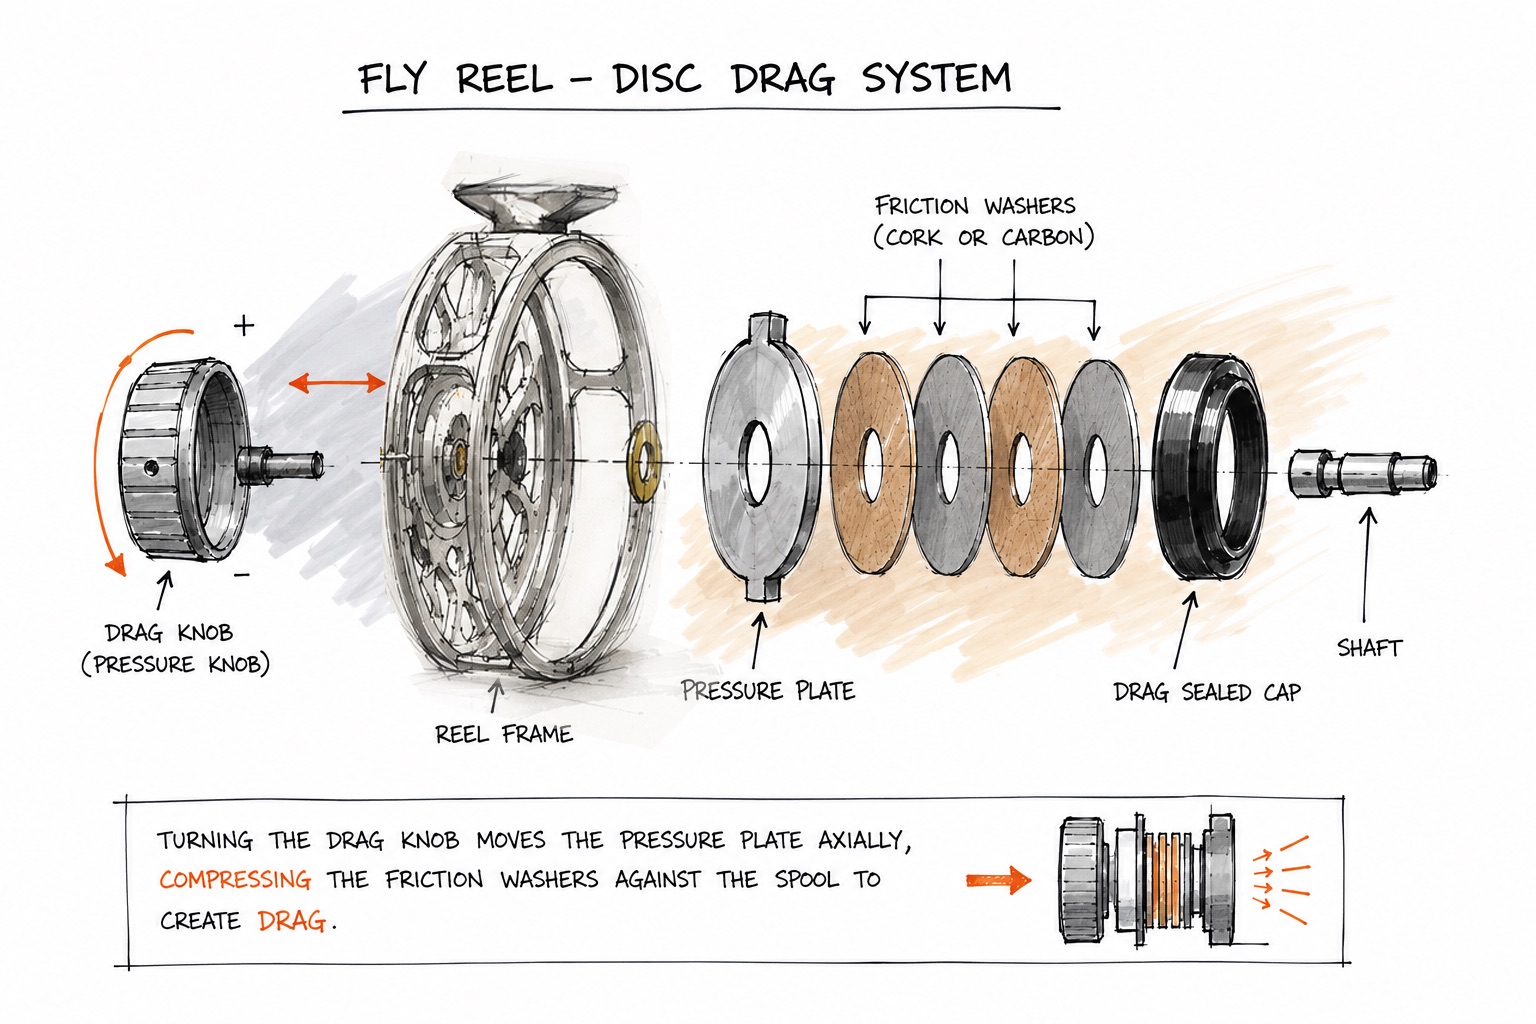
Understanding the Mechanical Drag System
Mechanically, cork and carbon disc drag systems can be very similar. The main difference is the friction material.
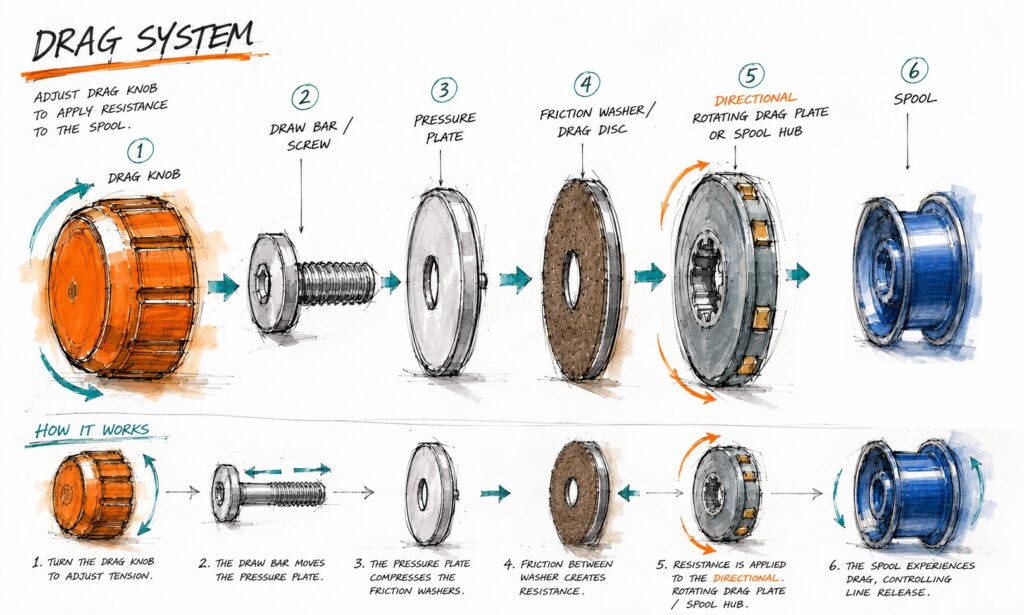
In a draw-bar disc drag system, when the angler tightens the adjustment knob, the screw or draw bar increases pressure inside the drag stack. This pressure pushes the pressure plate against the friction washer and drag plate. The friction created between the metal plate and the friction material controls how freely the spool can turn when a fish pulls line.
In simple terms, the drag system is a controlled brake.
The smoother the transition from a still spool to a moving spool, the better it protects the tippet. The more consistent the pressure, the more predictable the reel feels during a fight.
So the question is not only:
Which material has more stopping power?
For Euro nymphing, the better question is:
Which material gives smooth start-up, low maintenance, consistent performance, fine-tippet protection, and good resistance to water, sand, and silt?
Cork Drag
Cork drag has a long history in premium saltwater and big-game fly reels. Many anglers still view it as one of the classic gold-standard drag materials for powerful fish such as tarpon, permit, bonefish, and other fast-running species.
Cork drag uses cork as the friction material. In high-end reels, this is not ordinary cork. It is usually high-quality compressed or treated cork designed to handle pressure and repeated use. The cork washer is matched with precision-machined metal drag plates so pressure can be applied evenly.
Pros of Cork Drag
The biggest strength of cork drag is its smooth start-up. A well-designed cork drag can transition from a still spool to a moving spool with very little hesitation. This helps reduce sudden shock when a fish makes a hard run, which is especially important when protecting lighter tippet.
Cork also has a naturally progressive feel. Under pressure, it compresses slightly, allowing the drag force to build in a smooth and controlled way rather than feeling abrupt. This gives cork drag the refined feel many anglers associate with classic high-end reels.
Cork also carries a sense of tradition and craftsmanship. For many experienced anglers, cork drag is not only a technical feature. It represents a certain kind of reel-making heritage. A customer who asks for cork drag may be expecting the smooth, powerful, classic feel associated with big-game reels from makers such as Abel or Tibor.
Cons of Cork Drag
The weakness of cork is maintenance.
Cork drag is a little like owning an old Jaguar. It has charm, history, and a beautiful feel, but it rewards the angler who understands maintenance.
Cork usually needs proper lubrication with cork drag grease. When properly greased, adjusted, and cared for, cork can feel wonderfully smooth. But if it dries out, becomes contaminated, or is neglected, it may lose that silky feel.
Cork can also be affected by water, dirt, drying, compression, and long-term wear if it is not cared for properly. In a Euro nymphing reel, this matters because the reel is often exposed to wet hands, sand, silt, mud, and gravel. Fine particles can reduce smoothness and make the drag feel less consistent.
For big-game saltwater reels, many anglers accept the maintenance because cork gives them a classic feel and strong, smooth braking power. For Euro nymphing, the balance is different. The reel is used more often in gritty freshwater environments, and the drag usually does not need extreme stopping power. It needs smoothness, consistency, and reliability with minimal attention.
Carbon Fiber Drag
Carbon fiber drag uses carbon fiber as the friction material. Like cork, it works by creating controlled friction between the friction washer and metal drag plates. The mechanical idea is similar, but the material behavior is different.
Carbon fiber is widely used in modern disc drag systems because it is strong, stable, and resistant to wear. It can perform well under pressure and can be designed into compact, sealed, or semi-sealed drag systems.
Pros of Carbon Fiber Drag
The biggest advantage of carbon fiber is consistency.
Carbon fiber is more stable in wet and dirty conditions than cork. It does not require the same level of lubrication and care. For a Euro nymphing reel, this is important because the reel is often exposed to water, silt, sand, and streamside dirt.
Carbon fiber can also be very smooth when the drag system is well designed. The smoothness does not come only from the carbon material. It also depends on the flatness of the metal plates, the pressure distribution, the machining tolerance, the drag stack design, and the adjustment range.
Carbon fiber also works well in lightweight, modern reel designs. It can provide enough braking force for trout and Euro nymphing without adding unnecessary weight or complexity. For a fine-tippet system, the goal is not maximum drag power. The goal is controlled, predictable resistance.
Another strength is lower maintenance. A carbon drag system can be designed to be more water-resistant and less sensitive to dirt and drying. This makes it practical for anglers who want reliable performance without frequent greasing or adjustment.
Cons of Carbon Fiber Drag
Carbon fiber is not automatically better just because it is modern. A poorly designed carbon drag can still feel rough, grabby, or inconsistent.
If the drag plates are not machined well, if pressure is uneven, or if the drag stack is poorly designed, carbon fiber will not feel smooth. The material alone does not create a good drag system. The whole system must be designed correctly.
Carbon fiber may also lack the classic feel and tradition of cork. Some experienced anglers like the warmer, more progressive feel of cork. Carbon fiber can feel more mechanical or modern, depending on the design.
Another possible weakness is that some carbon drag systems can have slightly more start-up feel than a perfectly tuned cork drag. But in a well-designed modern reel, this can be minimized through proper material choice, surface finish, pressure plate design, and drag adjustment range.
Comparing Drag Smoothness
After looking at the strengths and weaknesses of both materials, the next question is how each drag feels through the adjustment range.
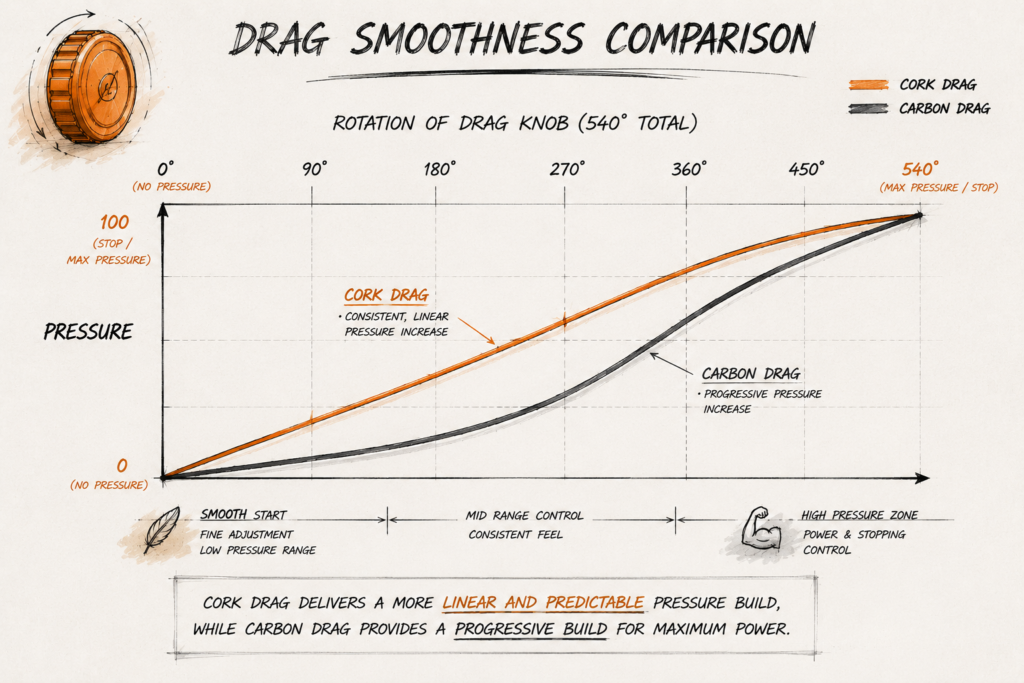
The smoothness chart above is a conceptual comparison between cork and carbon fiber drag systems. For this example, assume the drag knob rotates from 0 degrees to 540 degrees, or about one and a half turns.
At 0 degrees, there is no drag pressure. At 540 degrees, the system reaches maximum pressure or near lock-up.
In this simplified comparison, cork drag builds pressure in a more linear and predictable way through most of the adjustment range. The pressure increases steadily as the knob turns. This gives cork a very consistent relationship between knob rotation and drag pressure.
Carbon fiber drag can feel very smooth in the lower and middle range, especially when the drag stack is well designed. Depending on the thread pitch, pressure plate design, washer material, surface finish, and drag geometry, carbon may build pressure more progressively. It may feel lighter at first, then increase more quickly from the mid-range into the higher-pressure zone.
For fine-tippet Euro nymphing, this can be useful. Most trout fishing happens in the lower-to-middle drag range, where the reel needs to start smoothly, protect light tippet, and allow controlled line release. In that practical working range, a well-designed carbon fiber drag can give the smoothness and control needed without requiring the extreme stopping power of a big-game reel.
This does not mean cork is always smoother or carbon is always more powerful. It means cork drag may feel more consistent in relation to drag knob rotation, while carbon fiber drag may build pressure more progressively, especially from the mid-range into the high-pressure range.
In both cases, the final drag feel is controlled by the whole mechanical system, not only by the friction material. Thread pitch, pressure plate design, washer material, surface finish, machining tolerance, and drag geometry all affect how the drag feels in the hand and performs on the water.
Cork vs. Carbon for Euro Nymphing
For Euro nymphing, the drag system should be judged by the fishing method, not by tradition alone.
Cork drag is beautiful, classic, and proven. It has a smooth, progressive feel and a long history in premium big-game reels. But it requires more care. It needs grease, adjustment, and protection from contamination. It is best for anglers who appreciate traditional reel craftsmanship and are willing to maintain it.
Carbon fiber drag is more practical for a modern Euro nymphing reel. It offers consistency, durability, lower maintenance, and better resistance to water, sand, and silt. When properly designed, it can provide the smooth start-up and controlled resistance needed to protect fine tippet.
In Euro nymphing, the reel does not need to stop a powerful saltwater fish. It needs to manage thin line, protect fine tippet, and perform smoothly in a wet, gritty freshwater environment. That changes the design priority.
Summary
Cork drag and carbon fiber drag can use a similar mechanical system. Both rely on pressure, friction washers, and metal drag plates to control spool movement. The difference is how each material behaves under pressure, moisture, dirt, and long-term use.
Cork drag is classic, smooth, progressive, and admired by many experienced anglers. Its weakness is maintenance. It works best when properly greased, adjusted, and cared for.
Carbon fiber drag is modern, stable, durable, and lower maintenance. Its performance depends heavily on good engineering, precise machining, and even pressure distribution.
For a Euro nymphing reel, I would choose carbon fiber drag.
Not because cork is bad, but because Euro nymphing demands a drag system that is smooth, light, consistent, water-resistant, dirt-resistant, and easy to maintain. Carbon fiber better matches those needs.
Most broken tenkara rod sections happen from handling mistakes, especially with beginners. A tenkara rod is telescopic, and for someone new to tenkara, the most common break is usually the rod tip. [ Read More ]
This often happens while extending the rod. The angler may pull the tip out too quickly, bend it at a sharp angle, or force the sections before they are seated correctly.
The rod tip is solid, while the rest of the sections are hollow. The solid tip is very strong and highly flexible. It is designed to cast a light tenkara line, follow the line during the drift, and protect the tippet when playing a fish. But even a strong tip can break if it is bent sharply or handled carelessly.
The second common reason for a broken tip is overconfidence or being in a hurry. Beginners break tips, but experienced anglers can also break them once in a while. It happens.
To replace a rod tip, please watch this video:
Another common break happens around section two while landing a fish. This can happen when the bend becomes too sharp, putting too much stress on one small area. It can also happen when a bead-head nymph hits the rod section and creates a small nick. That nick may look minor, but it can weaken the carbon wall and later cause the section to fail.
Lower-section breaks are usually caused by applying too much force at the wrong rod angle. A tenkara rod is strong when the bend is spread smoothly through the rod, but it is not designed to be forced into an extreme angle.
Sometimes, a broken rod can even come from being too happy.
One time I received a phone call from a customer. He was very excited to take a photo of his first golden trout. While taking the picture, his knee accidentally rested on the rod. Ouch. One of the middle sections broke.
Jamming the rod during reassembly is also very common.
Another time, I was giving a tenkara demo at an FFI event in Bozeman, Montana. A tenkara angler came up to me and asked if I could help unjam his rod. When I looked closely, I found that several sections had been reassembled in the wrong direction. This caused the rod to jam.
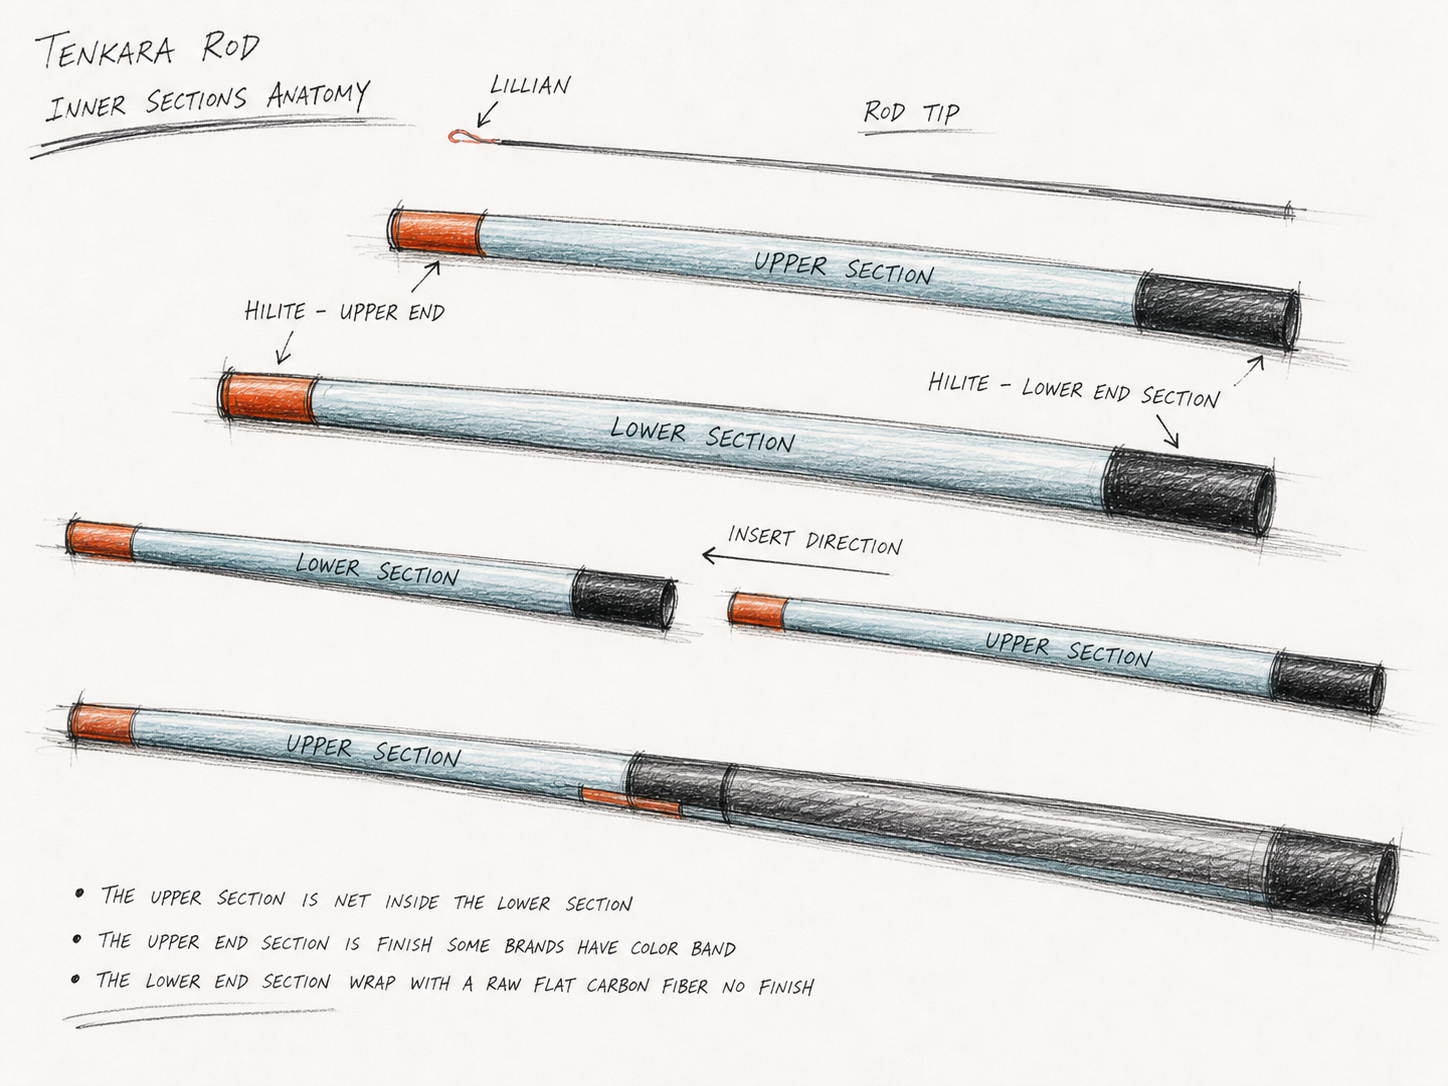
Many Japanese and Chinese telescopic rods have a fine highlight band near the upper end of each section. This band helps show which end goes up. Sometimes, after cleaning or disassembling the rod, an angler accidentally inserts the lower end first. When the section gets stuck, they force it—and that can damage or jam the rod.
Reassembling a tenkara rod is common after cleaning. The important thing is to do it gently, slowly, and correctly.
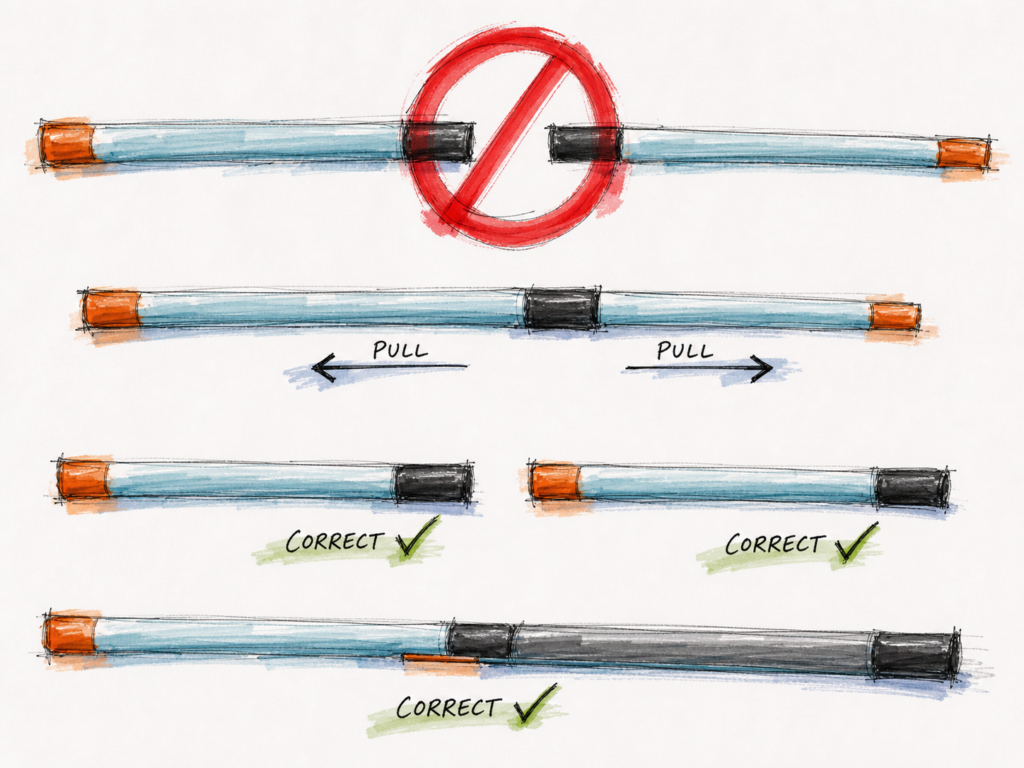
Do
Extend the rod carefully, one section at a time.
Keep the sections straight when pulling them out.
Make sure each section is seated gently, not forced.
When reassembling the rod, check the direction of each section before inserting it.
Look for the highlight band or finished upper end of the section.
Clean and dry the sections before reassembly.
Use light pressure only.
A loose concept sketch showing how tenkara rod sections should be handled, aligned, and pulled apart correctly.
Don’t
Do not pull the rod tip out at a sharp angle.
Do not force a section if it feels stuck.
Do not insert a rod section from the wrong end.
Do not twist or push hard when reassembling.
Do not rest your knee, foot, or body weight on the rod.
Do not rush when taking photos, cleaning, or packing the rod.
Final Thought
Replacing a tenkara rod section is usually simple, but preventing the break or jam is even better.
A tenkara rod is light, sensitive, and strong when used correctly. Most breaks do not happen because the fish is too big. They happen during setup, cleaning, transport, landing, or photographing fish.
Handle the rod gently, assemble it correctly, and let the rod do the work. That small habit will save many broken sections.
Tenkara 101 should stay at the conceptual level. The goal is not to overwhelm the beginner with too much technical detail, but to help them understand why the rod matters and how it works within the tenkara system.
In Western fly fishing, the rod is designed around casting a dynamic length of line. The fly line has weight, and that line weight loads the rod during the cast. The angler can also change the amount of line outside the rod tip.
Tenkara works differently.
A tenkara rod is designed around a fixed line length. There is no reel and no extra running line to shoot through the guides. Because of this, reach comes mostly from the rod length, the line length, and the angler’s position. If the angler needs more reach, the rod itself often needs to be longer.
The tenkara rod is the heart of the system. It gives the angler reach, control, casting rhythm, and a direct connection to the fly. In tenkara, the rod is not just a tool for casting. It is also part of the presentation, the hook set, and the way we control and land fish.
This section introduces the basic structure of a telescopic tenkara rod, including the collapsed length, sections, tip, lillian, grip, and overall balance. It also explains rod length and action in a simple way, showing how softer and stiffer rods feel different during casting and while fighting fish.
We will also look at the simple physics behind how a tenkara rod works: how it flexes, stores and releases energy, creates leverage, protects light tippet, and gives the angler a sense of swing feel in the hand.
Finally, this section will help beginners choose their first rod—one that is easy to cast, comfortable to fish, forgiving, and suitable for the type of water they fish most.
Topics Covered
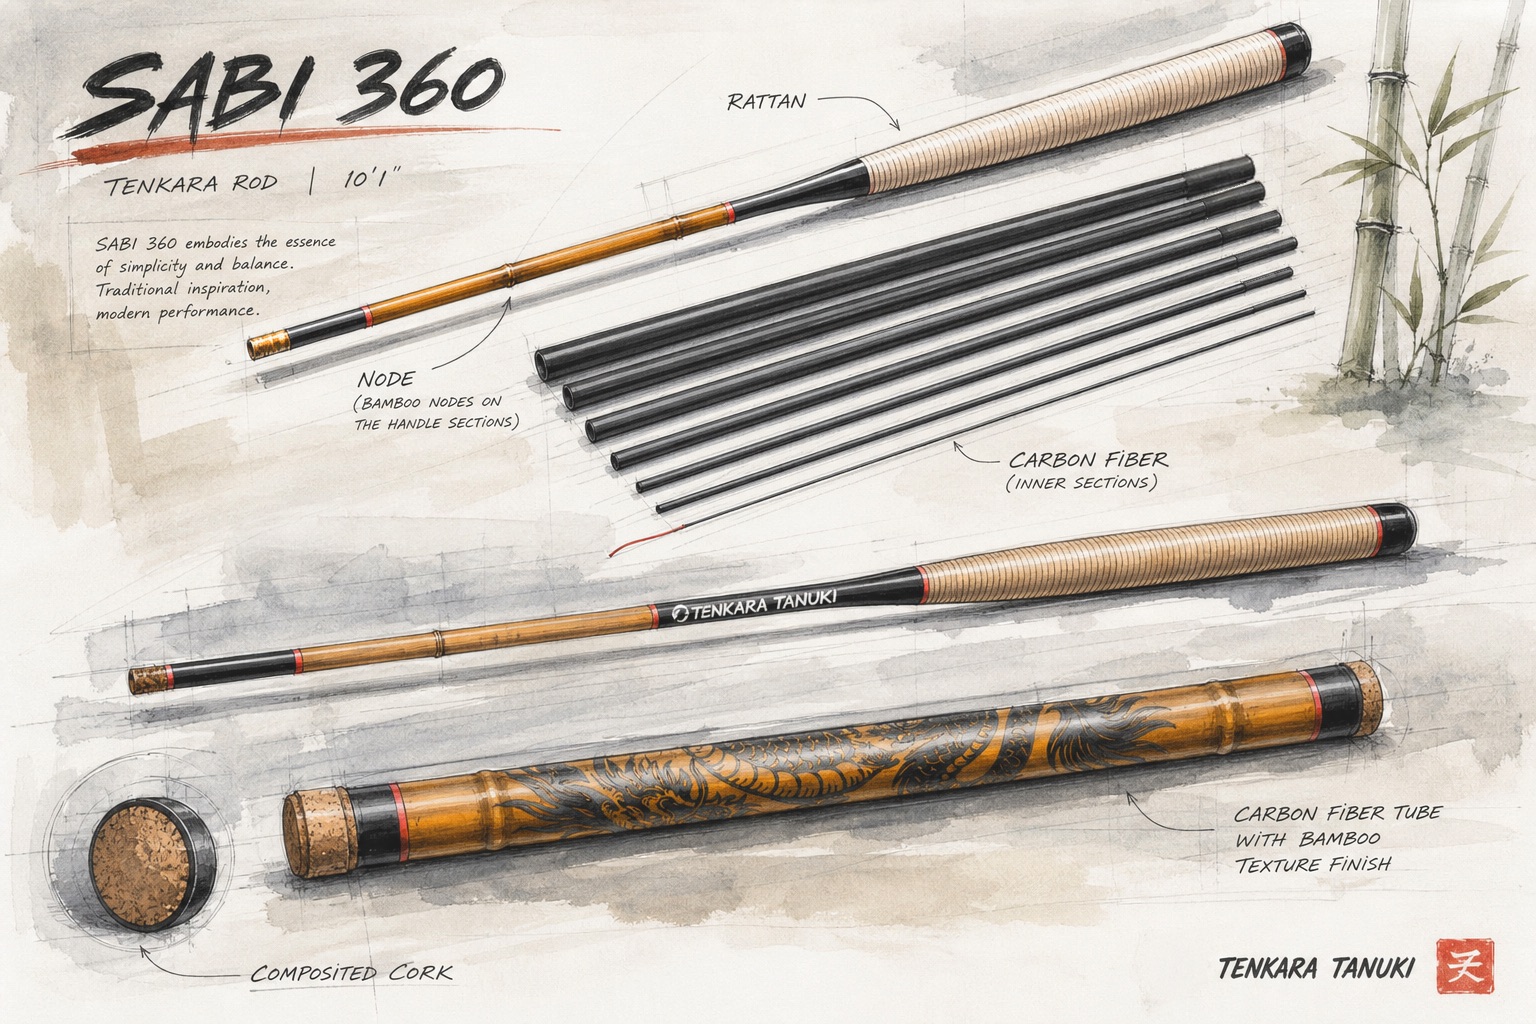
1. Understanding the Telescopic Rod
A tenkara rod is a telescopic rod. This means each section slides inside the next larger section when the rod is collapsed. When the rod is extended, the sections lock together through friction, creating one long, flexible fishing rod.
In the Japanese rod system, the sections are usually numbered from the tip toward the handle. The very tip section is Section #1. Attached to the end of this tip is a short braided cord called the lillian, which is where the tenkara line connects. From there, the sections are counted down toward the grip and handle section.
When tenkara was introduced to the United States, Tenkara USA used the reverse section numbering system: the handle section is Section #1, and the rod tip is the last section. At Tenkara Tanuki, I keep the Japanese section numbering system to respect the origin of the rod design.
Each rod section is shaped like a very long, thin cone. The smaller diameter points toward the rod tip, and the larger diameter points toward the handle. This tapered shape allows each section to slide into the next larger section, but also prevents it from passing completely through.
Near the bottom of each section, there is usually a short area of unfinished carbon, often about two to three inches long. This unfinished surface helps increase friction so the sections hold together when the rod is extended.
Older Japanese tenkara rods often had much longer handle sections. For example, an 11-foot rod might have had a collapsed length of around 38 inches. Today, because carbon materials, mandrel design, and manufacturing technology have improved, some modern tenkara rods can collapse much shorter. Some compact rods may have handle sections around 12 inches long.
But shorter collapsed length comes with a trade-off.
For the same full rod length, a shorter collapsed rod needs more sections. More sections mean more overlapping material, more reinforced areas, and often a steeper taper between sections. This can make the rod heavier, stiffer, and less smooth in casting feel. It may also create more air resistance because the rod has more step changes in diameter along its length.
A longer collapsed rod is usually less convenient to pack, but it can often feel smoother, lighter, and more refined in casting. A shorter collapsed rod is easier to carry in a backpack or travel bag, but it may sacrifice some performance.
So rod design is always a balance between convenience and performance. A compact rod is easier to transport. A longer-collapsed rod may offer better casting feel, smoother flex, and lighter swing weight. Neither is automatically better. The right choice depends on how and where you fish.
Multi-Length Rods
In the 1990s and early 2000s, Japanese rod makers introduced 2-way and 3-way rods. These rods could be fished at more than one length. Later, in the United States, similar rods became commonly known as zoom rods or multi-length rods.
Multi-length rods are convenient because one rod can cover different fishing situations. But there is also a compromise. Compared to a fixed-length rod, a multi-length rod often has less refined balance and performance. Japanese anglers eventually found that while these rods are useful, many serious anglers still prefer the feel of a dedicated fixed-length rod.
As a rod maker and designer, I believe the most important quality of a rod is balance. After balance comes responsiveness, sensitivity, ergonomics—especially for longer rods—and finally rod action.
Many anglers begin by asking about rod action first. But in my view, action is only one part of the story. A rod can have the “right” action number and still feel poor in the hand if the balance is not right.
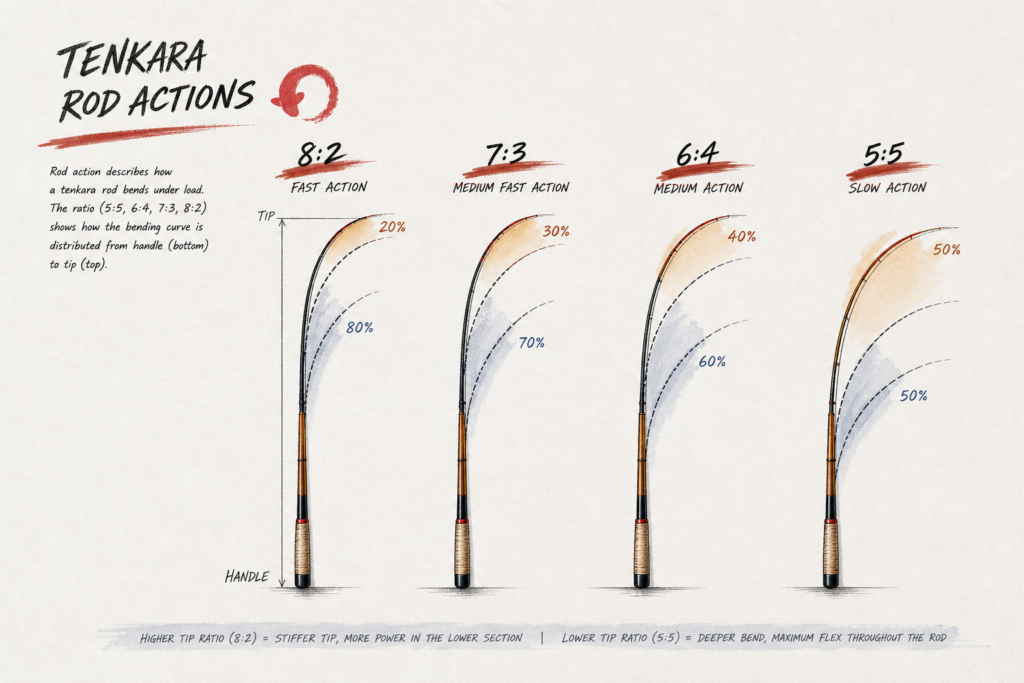
2.Rod Action
An illustration showing how a tenkara rod bends to reflect its action and feel under load.
Like many anglers, tenkara anglers often pay close attention to rod action. But rod action can also be one of the most misunderstood parts of choosing a rod.
In the Japanese system, rod action is often described with numbers such as 5:5, 6:4, 7:3, or 8:2. These numbers describe where the rod bends during casting. A 5:5 rod bends closer to the middle of the rod. A 6:4 rod bends slightly above the middle. A 7:3 or 8:2 rod bends more toward the tip.
This bending is not just a static shape. It happens during casting motion. As the rod moves through the air, the rod experiences resistance. The rod flexes, stores energy, and then releases that energy to cast the line. Where the rod bends most gives us a general idea of its action.
Rod action also depends on the angler’s casting stroke. A slow, smooth casting stroke may make the rod bend deeper. A quicker, shorter stroke may make the same rod feel faster and more tip-oriented. This is why two anglers may describe the same rod differently. The rod has its own design, but the angler’s motion brings that design to life.
A shorter rod has less length available to bend. Because of this, it is harder to create a true soft 5:5 action in a rod shorter than about 10 feet. If a short rod is made very soft, it may need longer flexible sections, or it may begin to feel too soft and unstable—what some anglers call a “noodle rod.”
Longer rods are different. A longer rod has more room to bend, so it is easier to create a deeper flex. But there is also a trade-off. If a rod longer than about 12 feet has a very deep 5:5 action, the swing weight can increase dramatically. More of the rod’s working mass moves farther from the hand, making the rod feel heavier during casting.
A slower-action or softer rod often feels easier and more relaxed to cast. It bends deeper, loads with less effort, and gives the angler a smooth feeling during the cast. This can be very enjoyable, especially when fishing at close range or when using a gentle casting stroke.
But a softer rod also has limitations. It may be less accurate, especially when casting into wind or trying to place the fly precisely. It can also be harder to control larger fish, especially in fast water. This becomes more noticeable with longer rods, where a slow action can increase swing weight, slow recovery, and make the rod feel less balanced in the hand.
A faster-action rod bends more toward the tip and usually recovers more quickly. It can make casting more precise and gives the angler better control when fishing a longer rod or when fighting fish in faster current. A faster rod can also help move the line and fly more directly.
But faster rods have their own trade-off. Because they bend less deeply, they may place more torque on the hand during acceleration. They can also feel less forgiving if the casting stroke is too aggressive or abrupt. With a faster rod, the angler may feel more direct contact between the hand, the rod, and the fish—but that also means mistakes can transfer more quickly through the system.
So rod action is not simply about choosing soft or stiff. It is about how rod length, taper, section design, material, casting stroke, water condition, fish size, and balance all work together. A good rod action should match the length of the rod and the purpose of the fishing.
The best action is not the softest or the stiffest. It is the one that gives the angler control, feel, and confidence on the water..
Euro nymphing did not begin as a world separate from fly fishing. It came from fly fishing. Both the euro nymphing rod and reel are rooted in the traditional fly rod and fly reel, but over time each has been refined to better serve a method built on contact, sensitivity, and control.
Like the rod, the reel has gradually taken on its own specialized form. It is designed to handle euro nymphing lines more effectively, improve line control, and better protect fine tippet. The deeper I got into reel development, the more I came to see that the euro nymphing reel is still very much a fly reel—just shaped more deliberately around a specific way of fishing.
At its core, the drag system in a euro nymphing reel is still a modern fly reel disc drag. What makes it different is not that it belongs to a completely separate category, but that it is shaped around the more specialized demands of euro nymphing: managing thin line, protecting fine tippet, and delivering smooth, controlled performance in a highly focused system.
That is why, the more I worked on reel development, the more I realized that drag cannot be looked at by itself. It has to be understood as part of the whole reel design. The frame, spool shape, arbor size, and drag system all work together. In euro nymphing, where precision and line control matter so much, those relationships become even more important.
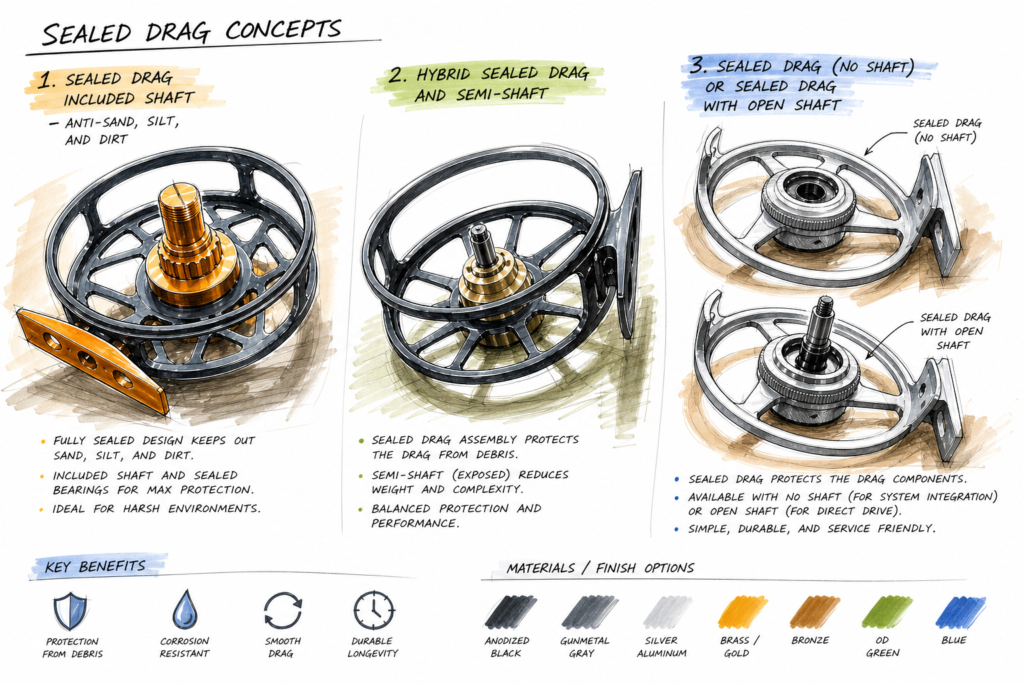
Today, sealed drag systems are commonly used in modern fly reels, but not all sealed systems are the same. There are different levels of sealing, depending on how much of the drag system and shaft are protected.
The most protected design is a fully sealed drag and shaft system. In this design, both the drag discs and the main shaft are enclosed. This helps prevent sand, dirt, and silt from reaching the shaft and drag components. It also reduces maintenance time because less debris can enter the working parts of the reel.
A second design is a partially sealed drag system with a semi-covered shaft. This protects the drag unit better than an open design, but the shaft is still partly exposed. It offers a good balance between protection, cost, and weight, but it is not as resistant to sand, dirt, and silt as a fully sealed shaft system.
The simplest design is a sealed drag with an open shaft, or sometimes an unsealed/open drag system, depending on the construction. This is usually the most economical and lightweight option. The trade-off is that the reel may require more cleaning, maintenance, and lubrication, especially after fishing in sandy, silty, or dirty water.
In general, the more fully sealed the system is, the better the protection. But more sealing usually means more parts, more machining, more cost, and sometimes more weight. Less sealing can make a reel lighter and more economical, but it also places more responsibility on the angler to clean and maintain the reel.
For a euro-nymphing reel, where fine line control and reliability are important, sealing is not only about keeping water out. It is also about keeping sand, silt, and dirt away from the shaft and drag surfaces, so the reel stays smooth with less maintenance.
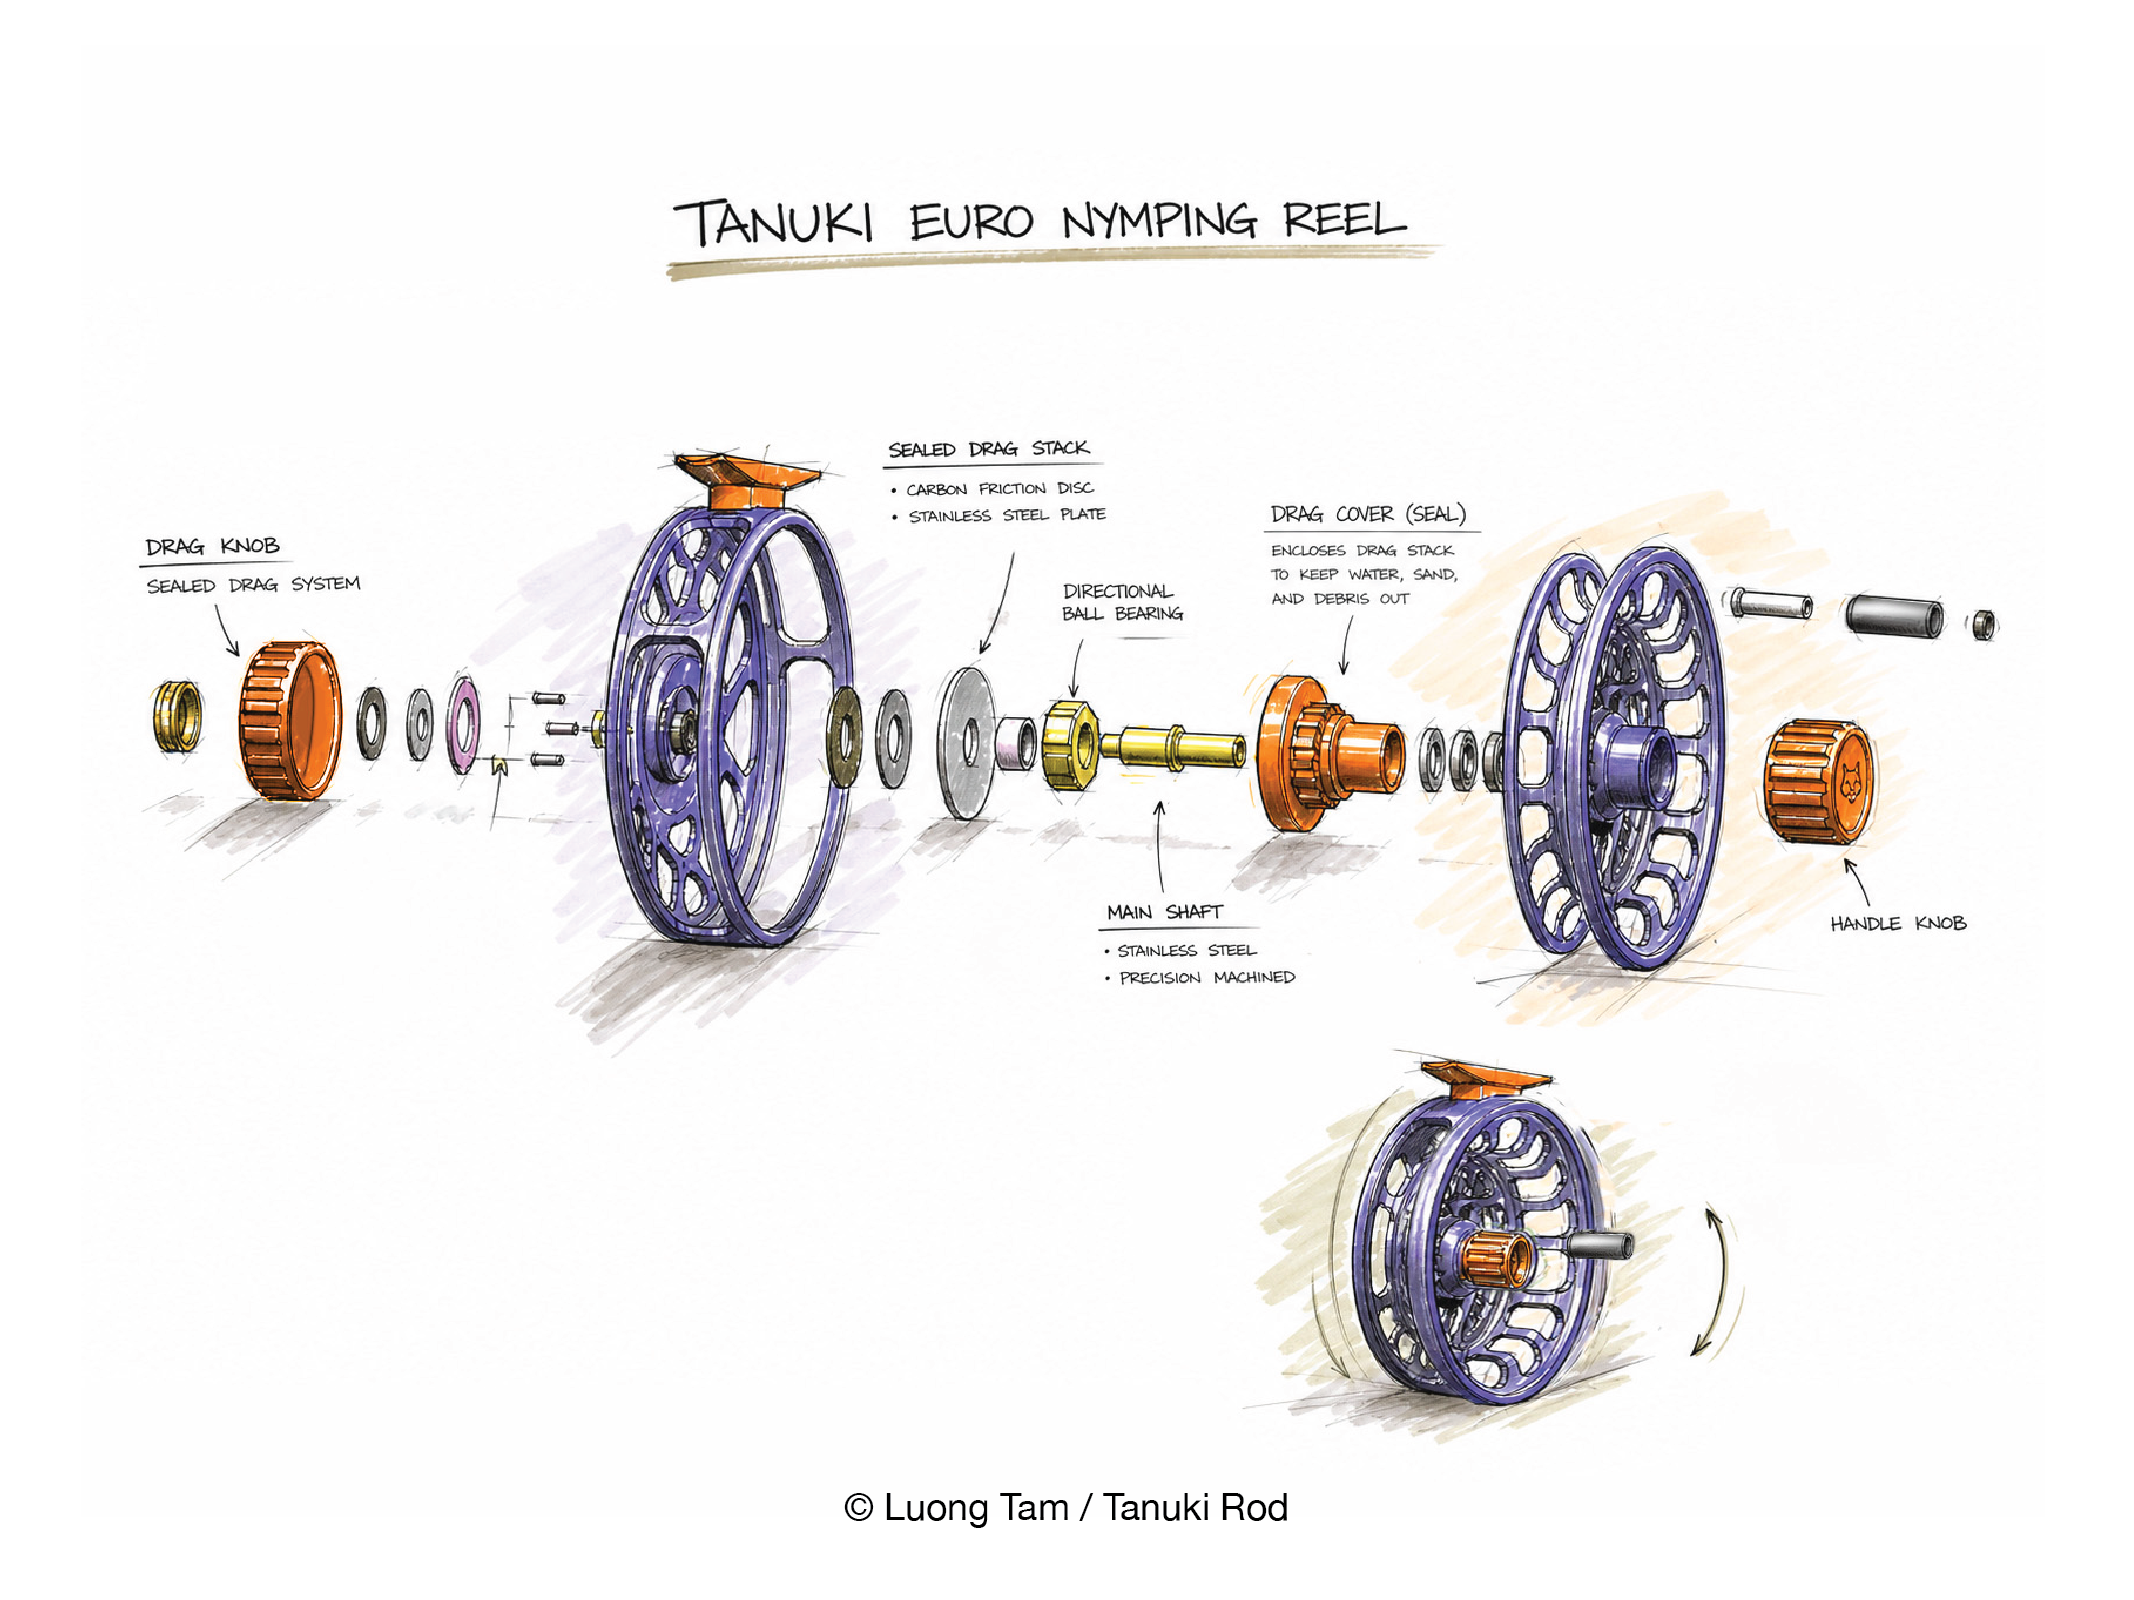
The basic mechanics of a disc drag system are simple. A drag friction disc is sandwiched between two metal plates. When the angler turns the drag knob, the knob increases or decreases pressure on the plates. More pressure creates more friction, and more friction creates more drag.
In this way, the disc drag works much like a brake system.
There are two common layouts: a single-disc drag and a stacked-disc drag. A single-disc system uses one friction disc between two plates. A stacked-disc system uses multiple friction discs and metal plates layered together.
Both systems can provide a good, smooth startup when designed properly. The difference becomes more noticeable as drag pressure increases. A stacked-disc system has more friction surfaces, so the pressure is spread across multiple contact points instead of concentrated on one disc. This can give the drag a smoother feel under higher load, provide stronger drag in a compact space, and help reduce heat buildup during longer runs.
However, a stacked-disc system also has trade-offs. It is usually more expensive to manufacture, can add weight, and requires a higher level of precision. The plates must be flat, evenly finished, and carefully aligned during assembly. If the machining, calibration, or pressure balance is poor, a stacked drag system may not feel smoother than a well-made single-disc system.
For a fly reel, especially a euro-nymphing reel, the goal is not only maximum drag power. The more important goal is smooth startup, controlled resistance, low heat buildup, and protection for fine tippet.
If you are interested in purchasing one of the final approval prototypes before full production, please join the prototype waiting list.
R-Ranch is one of those places that feels like a true getaway.
June 11-14, 2026
The ranch is about 45 miles from Kernville. The road winds through Kern River Canyon, following the Kern River most of the way. For anglers,If you are interested, please RSVP as soon as you can through the Tanuki website. Payment should be made to Thomas Paulson so he can book the cabin.
The cost is $120 per person, which covers the shared cabinfor 4 days and 3 nights.
The ranch is about 45 miles from Kernville. The road winds through Kern River Canyon, following the Kern River most of the way. For anglers, even the drive becomes part of the experience. Along the route, there are many fishing access points where you can stop, walk down to the river, and look for beautiful Kern River rainbow trout.
even the drive is part of the experience. There are many fishing access points along the road where you can stop the car, walk down to the river, and look for beautiful Kern River rainbow trout.
The area around the ranch is also full of hiking trails. For hikers, it is a chance to explore the quiet beauty of the forest, the river, and the mountains. It is the kind of place where you can fish in the morning, hike during the day, and sit by the lake in the evening.
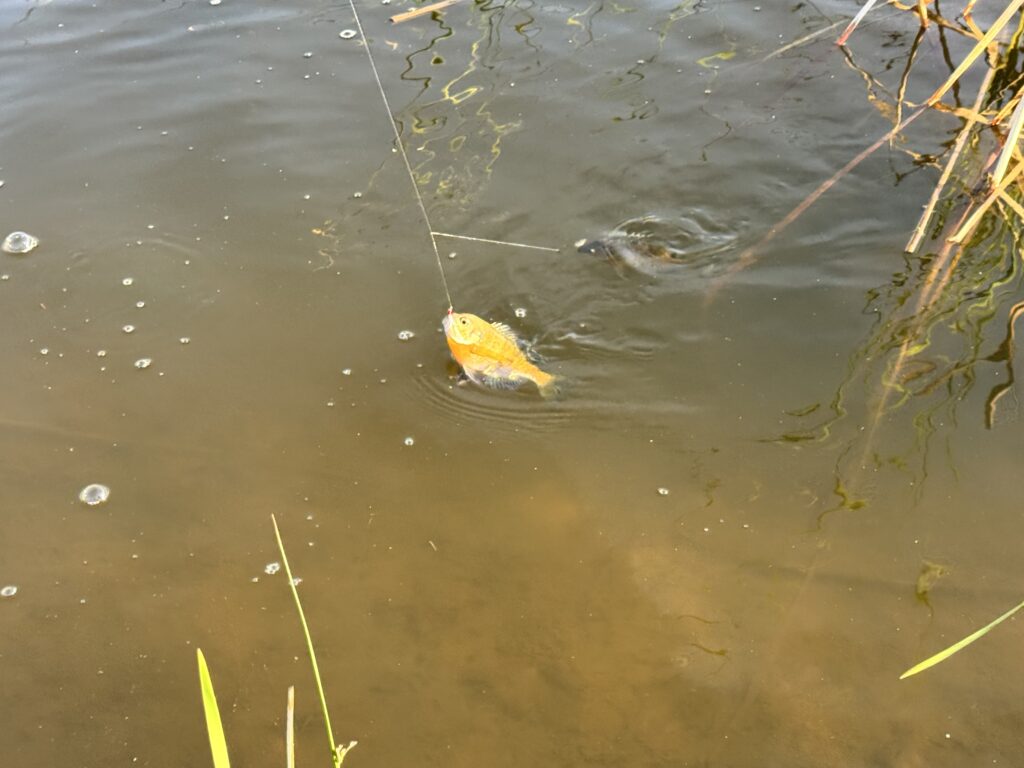
At the heart of the ranch is a quiet 10-acre alpine lake. The lake is full of bass, bluegill, and crappie. For warmwater fishing, it is a lot of fun. On a good day, an angler fishing with a tenkara rod can catch a surprising number of fish. Thomas told me that catching 250 fish in a day is possible. When fishing two flies, catching two fish at the same time is also common.
I have been to R-Ranch several times. My friend Thomas Paulson is one of the ranch owners, and he has kindly invited me to stay and hang out whenever I have an event nearby. Last year, Thomas and I organized a Tanuki warmwater event there. Unfortunately, I missed the event because of a family schedule conflict. But the idea stayed with me.
On my last trip, I finally had more time to fish the lake. I caught several double hookups. Some were double bluegill. Some were bluegill and bass. Some were bluegill and crappie. I have caught almost every combination except a double bass. Maybe that will be the next challenge.
For me, it was a thrilling experience. Warmwater fish are not the same as trout. Bluegill hit hard and fast. Crappie can be subtle. Bass make you slow down and wait before setting the hook. Each fish has a different character, and each one teaches something through the rod.
But R-Ranch is not only about catching fish.
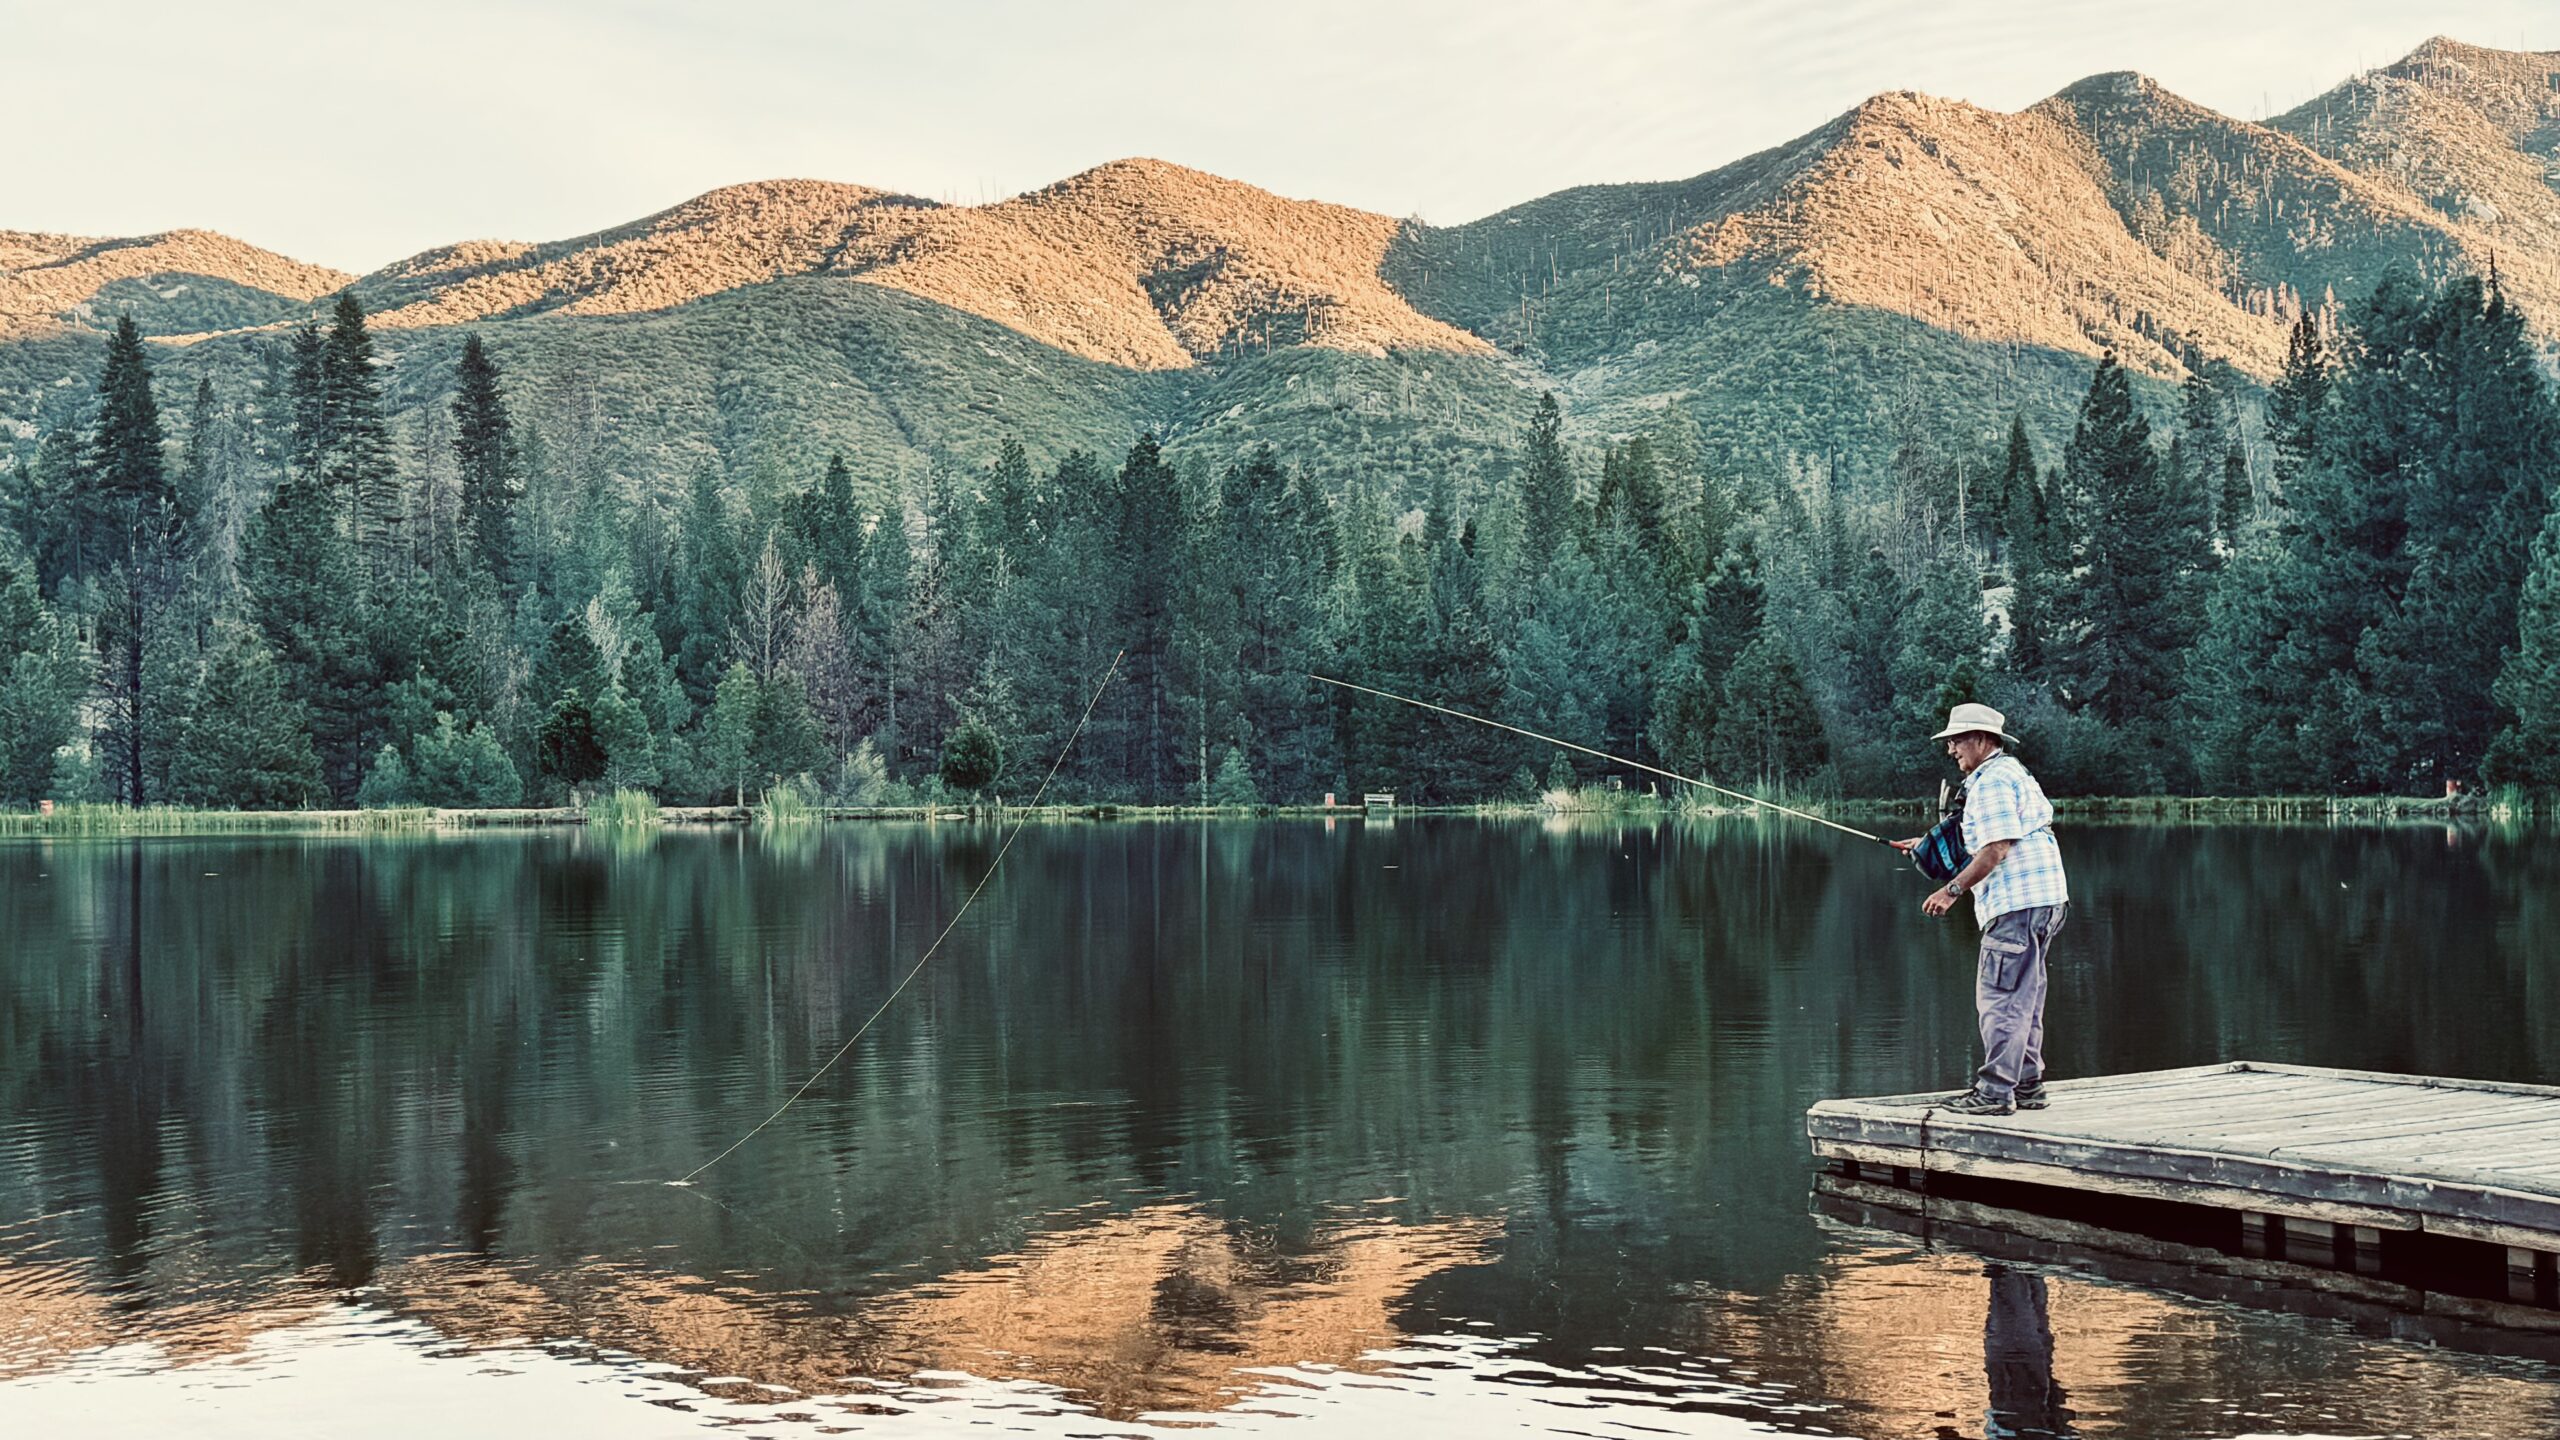
Some of my favorite moments were in the early morning and evening. In the morning, before the wind picked up, the lake was smooth like a mirror. The mountains reflected on the surface. In the evening, the golden sunlight touched the water and the surrounding hills. It was quiet, calm, and beautiful.
For photographers, it is one of the best times to take pictures. For fly fishers, it is also the perfect moment to make a long, romantic cast in the air, with the lake, mountains, and warm evening light behind them.
Staying at the Ranch
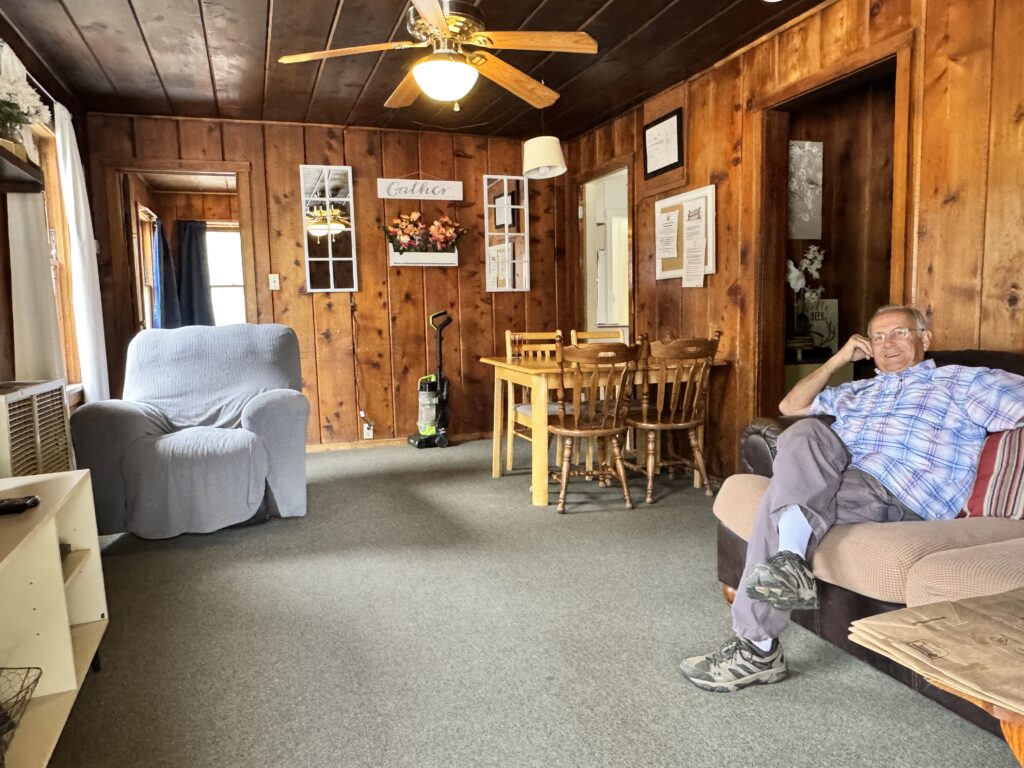
R-Ranch has a number of cabins owned by different ranch owners. Each cabin is a little different, but most have a kitchen, living rom bed rooms, and bed and bunk beds. Some cabins can sleep more than 10 people, which gives the ranch a friendly group-getaway feeling.
The ranch also has shared spaces, including a lecture hall, bar, and other gathering areas. It feels more like a small mountain community than a regular campground.
During my last stay, I stayed in a three-bedroom cabin. We drove down to Kernville to restock food and, for convenience, picked up ready-made meals from the Kernville market. After long days of fishing, that simple choice made life much easier.
I also liked having Kernville about 45 minutes away. The drive itself became part of the experience—a quiet break, a scenic ride along the river, and a chance to pick up supplies before heading back to the ranch.
That rhythm felt just right. Fish during the day. Return to the cabin. Share food. Talk about the fishing. Tie flies in the evening. Then wake up early and fish the lake again.
R-Ranch has fishing, boating, hiking, warmwater fish, nearby trout water, and beautiful scenery all in one place. You can chase numbers on the lake, explore the Kern River for native rainbows, or simply slow down and enjoy the ranch.
For anglers who want a few days away from daily life, R-Ranch offers something simple and memorable: good water, good fish, quiet mornings, golden evenings, and the kind of place that makes you want to come back.
This is where tenkara begins—not with complexity, but with simplicity.
Tenkara is a Japanese method of fly fishing built on a few essential elements: a rod, a line, a length of tippet, and a fly. There is no reel and no excess gear—just a direct connection between you, the water, and the fish.
To get started, you only need a minimal setup. Extend the rod, attach the line to the lillian, add a short length of tippet, and tie on a fly. That’s it. No complicated rigging. No heavy equipment.
The goal here is not perfection—it is movement. Get on the water, make a few casts, and begin to feel how the system works. Tenkara reveals itself through doing, not overthinking.
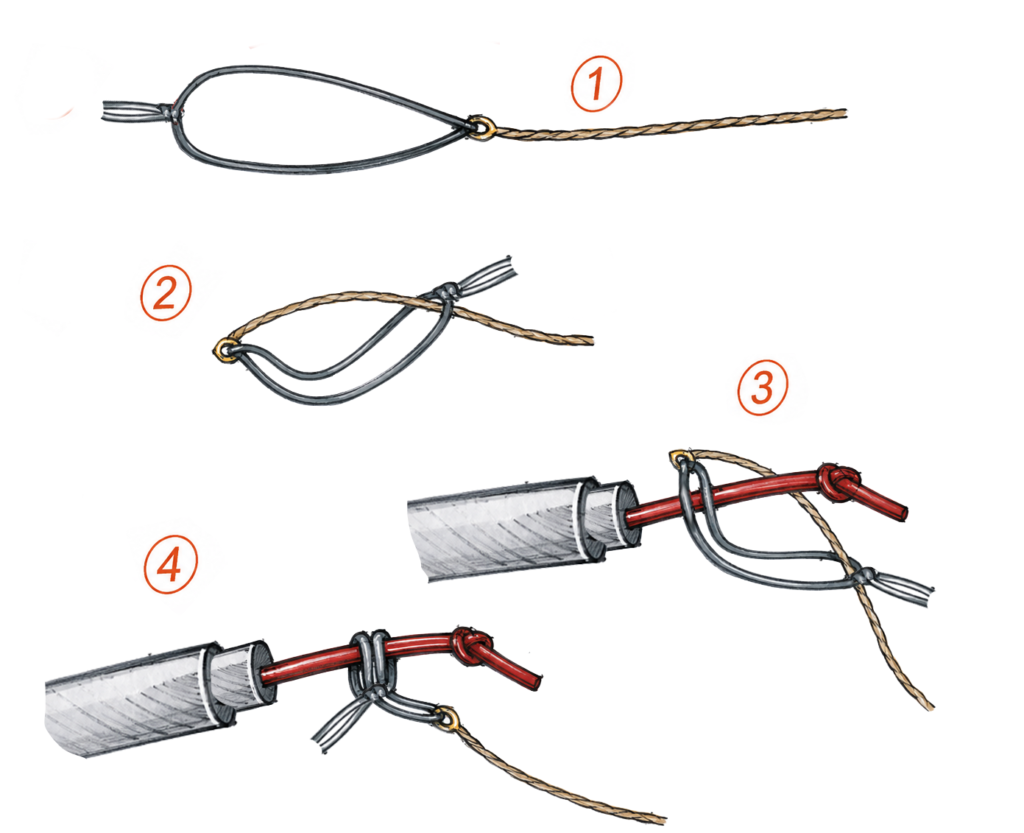
Extending the Rod and Connecting the Line
1. Hold the rod under your arm
Tuck the rod gently under your armpit to free both hands.
2.Connect the line to the lillian
A simple four-step guide showing how to connect the line to a tenkara rod lillian.
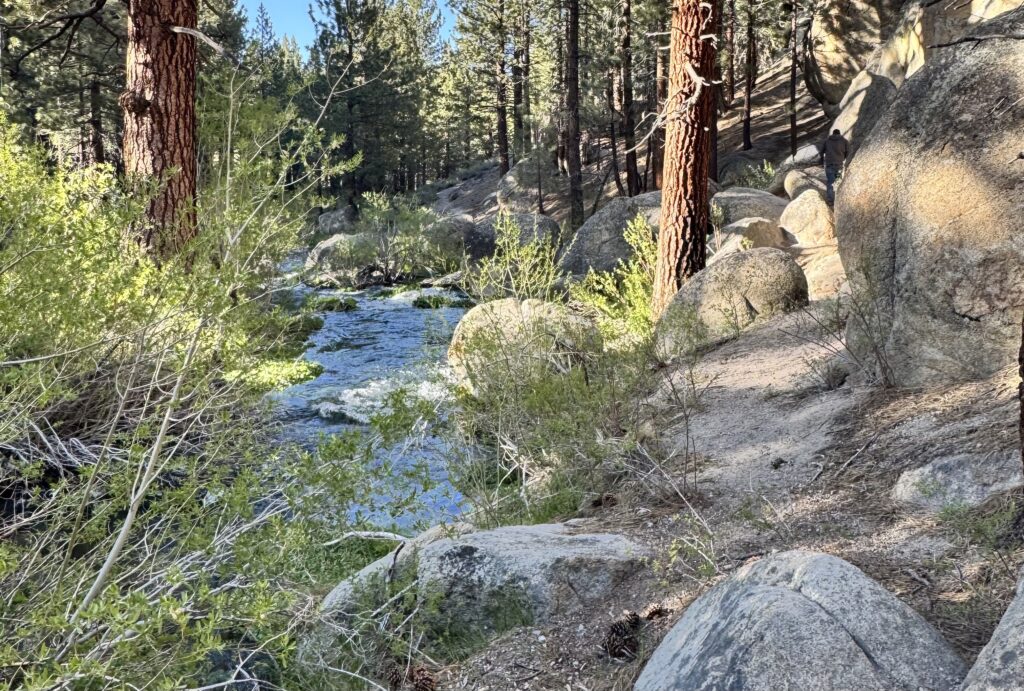
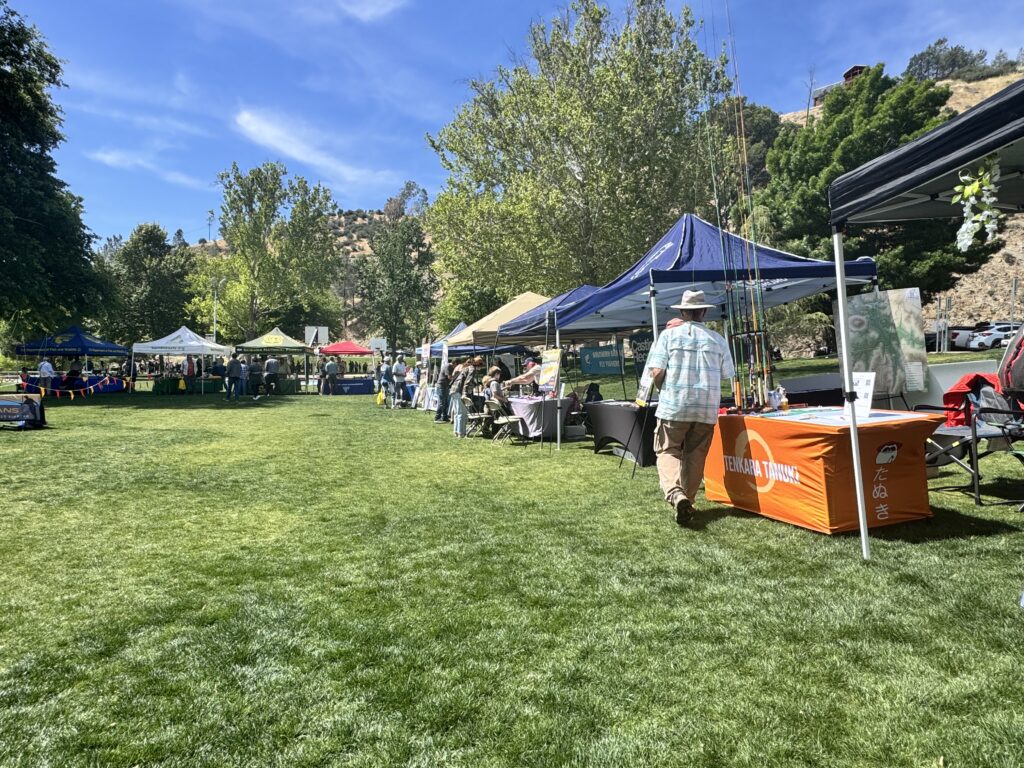
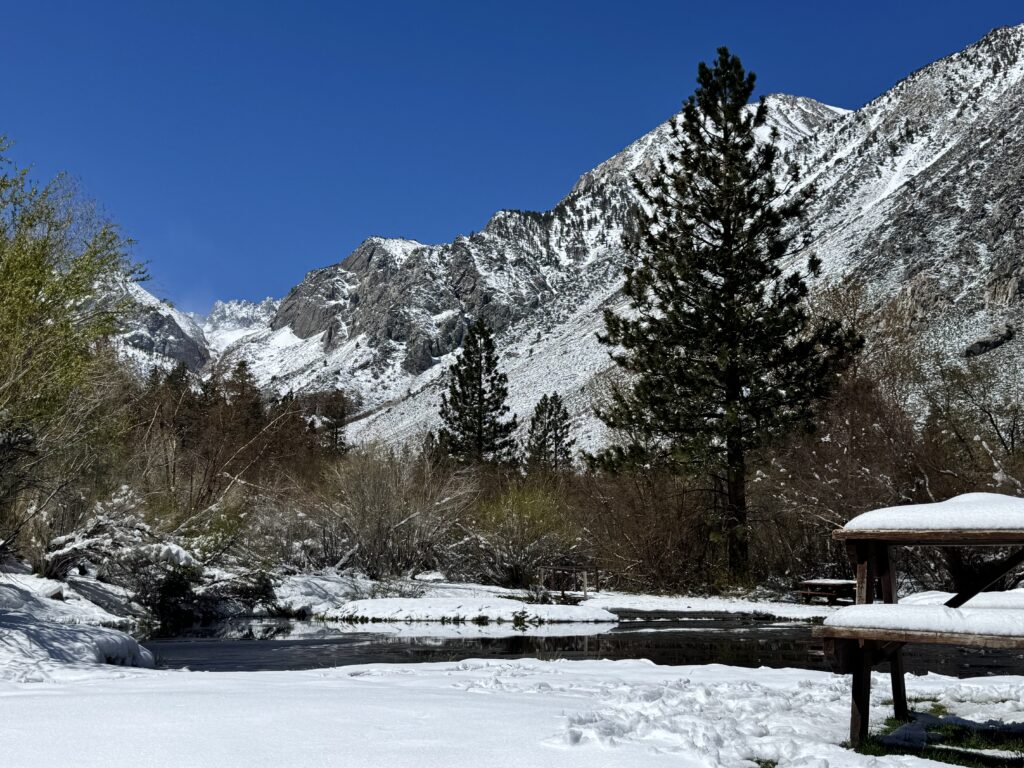
Last week began with a simple plan. I wanted to attend the Kern River Trout Fest, test the new Tanuki Euro Nymphing rod and reel, and spend a little time fishing in the Sequoia National Forest. But as often happens on a fishing trip, the road had its own plan.
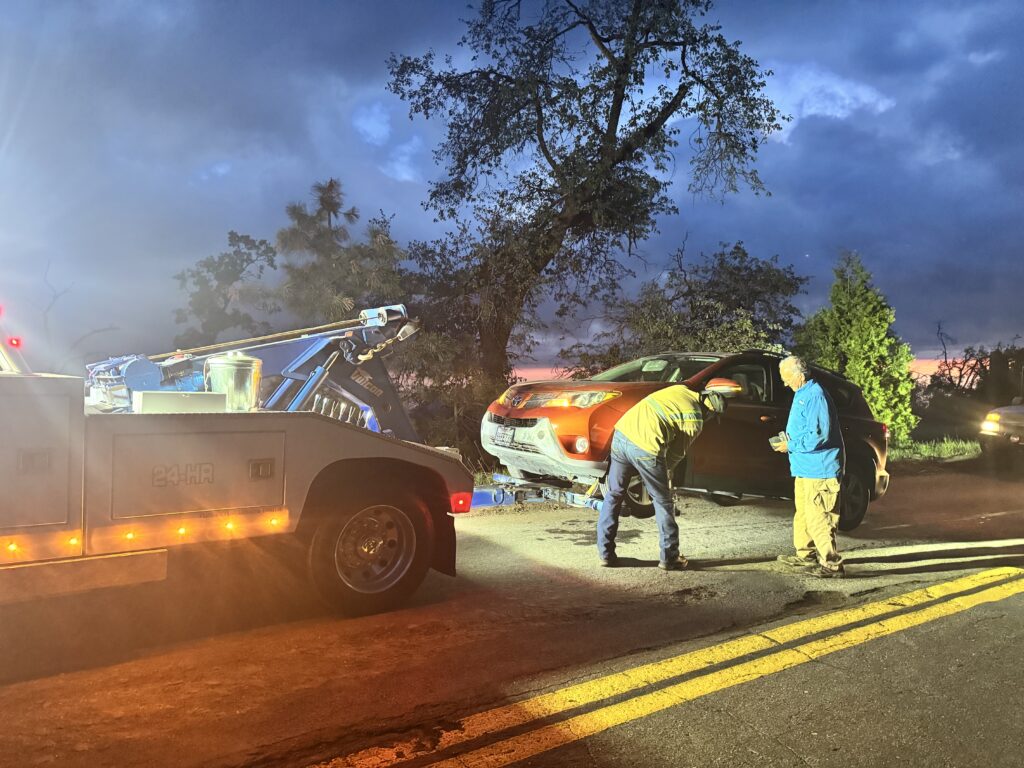
I was invited by Thomas Paulson to stay at R-Ranch the day before the event. R-Ranch is a private ranch in the Sequoia area. On the way there, my Toyota RAV4 decided to make the trip more interesting. Near the peak of the road, the cooling system blew up. Luckily, I was only a few miles from the ranch. I was also about one minute away from entering a dead zone with no cell signal. The nearest repair shop was still about an hour and a half away in Lake Isabella. Sometimes, timing is everything.
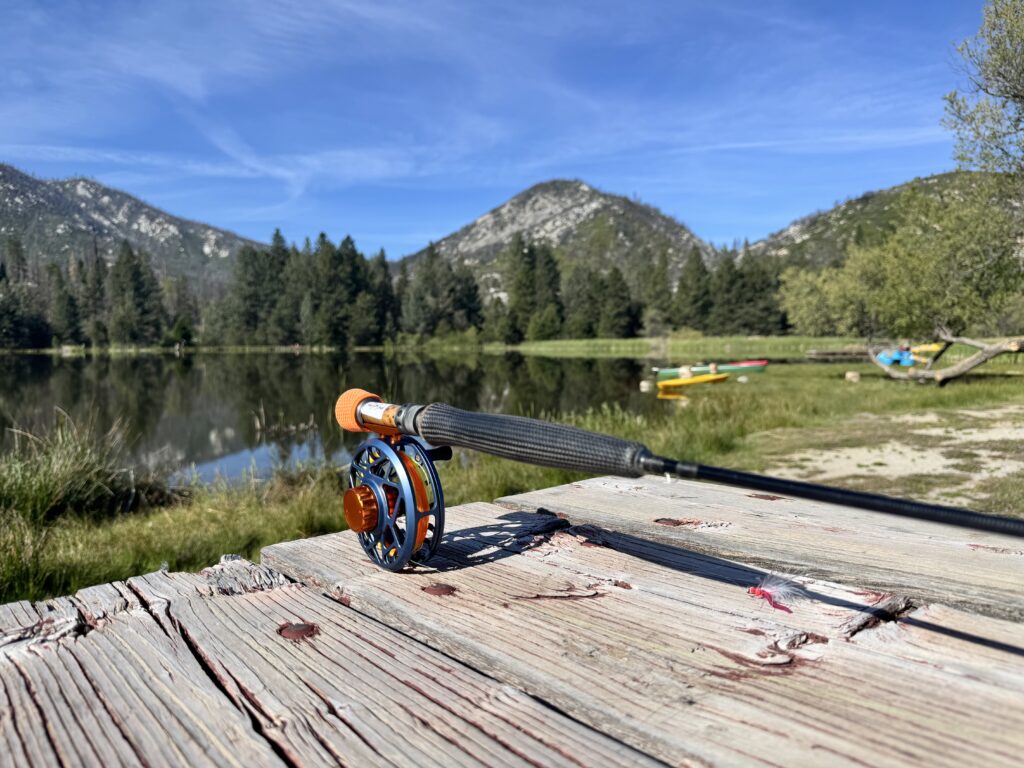
While I waited for the car repair, Thomas kindly extended my stay at the ranch for a few more days. That gave me an unexpected opportunity. I was able to test the Euro Nymphing rod on the ranch’s alpine lake. The lake is full of bluegill, crappie, and bass. A Euro Nymphing rod is not really designed for lake fishing, so this became an interesting experiment. I had time to slow down and focus. I began developing new techniques for fishing warmwater species with a long, sensitive rod.
One thing I learned quickly: crappie were the hardest fish to detect. Their takes were very subtle. Sometimes they felt like a large trout sipping softly in a deep pool. Bluegill were easier. They often hit with a sharper double-tick. Bass were different again. They made me rethink my timing.
At night, we tied flies. We also ate very simple micro-dinners because we did not have much time to cook. We watched Jaws while tying flies. Somehow, that felt perfect for a fishing trip. I also tied a new fly pattern. Thomas showed me some of his go-to flies.
I really enjoyed staying at the ranch. It is quiet, beautiful, and has the feeling of an alpine resort. Thomas suggested that we host a warmwater fishing getaway there. It would be for anglers who want a few days to slow down, enjoy nature, and fish. The ranch is about twenty minutes from the Kern River. There are also many hiking trails nearby. For anglers who want to explore, there may be chances to look for wild native Kern River rainbow trout. The ranch also offers horseback riding for a small fee. For anglers who want to focus on catching fish, the 10-acre lake is right there. And it is full of fish.
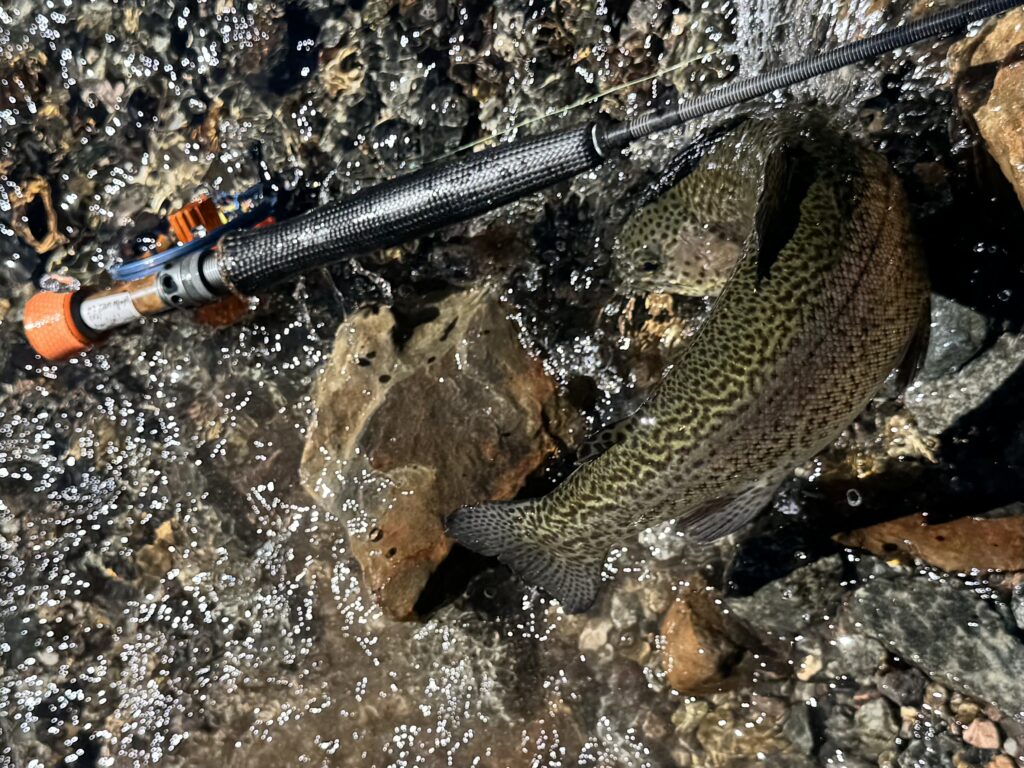
After the ranch, I followed Thomas to Bishop. The plan was to continue testing the rod on rivers and ponds. When we arrived, it was raining. Snow was falling in the mountains. We saw fish rising in a small pond and decided to try our luck. It turned out the pond had been well stocked.
I hooked two big fish. They gave me a real challenge. Because of the cloud cover, it was hard to see the line. But Euro Nymphing is not only about seeing. It is also about feeling the bite. By the end, I landed about 18 fish. Thomas, fishing with his tenkara rod, landed about 27. We both noticed one thing clearly. Rigging a Euro Nymphing setup takes more time than rigging a tenkara rod. Tenkara still wins when it comes to simplicity and speed.
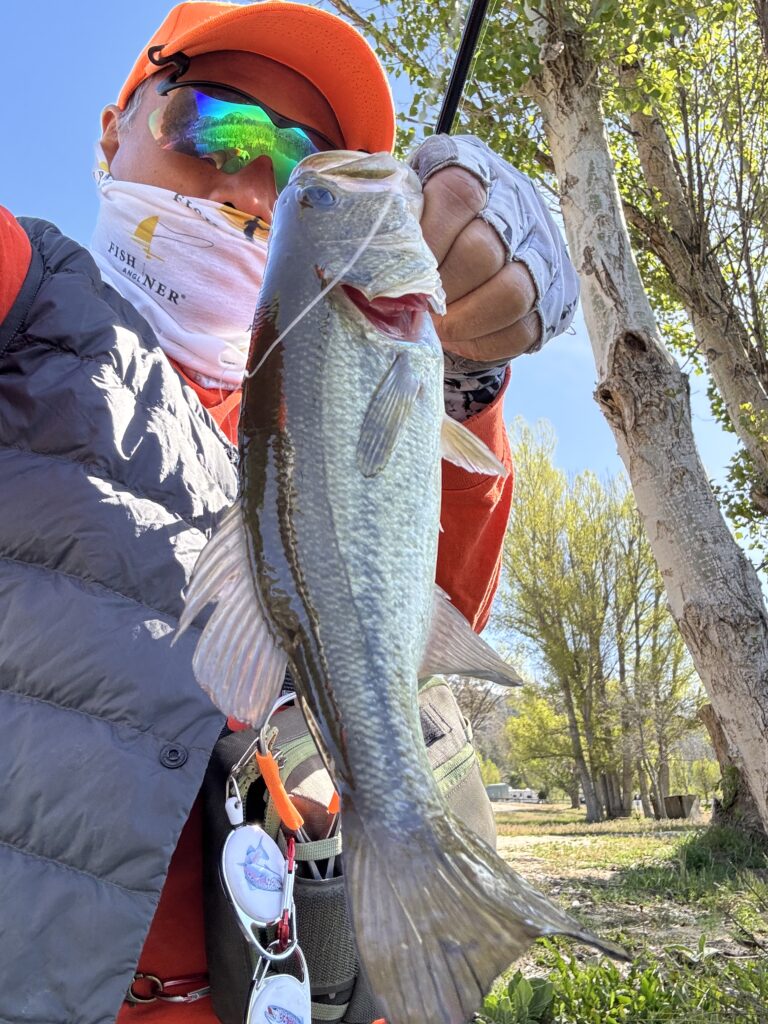
Over the next few days, Thomas introduced me to different local waters around Bishop. I started turning my attention to bass hunting. I hooked several good-sized bass, including one in the fast water of the Owens River. That was a lot of fun. I also tried a small stream that looked almost like trout water. It was clear, shallow, and technical. But the bass there were extremely spooky. I managed to land two. Those fish taught me a lot.
Bass are not trout. With trout, I often react quickly when I feel the take. But with bass, especially in slower or deeper water, they sometimes sip the fly first. If I reacted too fast, I pulled the fly right out of their mouth. I had to remind myself to be patient. Let the fish take it. Pause for a moment. “God save the Queen.” Then set the hook.
On the last day, I focused again on wild trout. That was a nice way to end the trip. After several days of trying to understand bass, crappie, and bluegill, detecting trout takes felt much easier. The contrast was valuable. Trout, bass, crappie, and bluegill all speak a different language through the rod.
This trip began with a broken car and an unexpected delay. But it turned into one of the most useful field-testing weeks I have had. I tested the Euro Nymphing rod and reel in situations they were not originally designed for. I learned more about warmwater fish behavior. And I gained new ideas for future rod development.
I did not expect this trip to become a warmwater and lake test for the Euro Nymphing rod. But in the end, I caught bass, bluegill, crappie, stocked trout, and wild trout. I also tested the rod in still water, ponds, small streams, and different flows of the river. It became a much broader field test than I had planned.
I also broke the rod tip twice. It did not break on a fish. It broke on a tree because I was a little impatient. Luckily, both breaks were only a few inches from the tip top, so I was still able to keep fishing. That is also part of testing. The reel performed beautifully. The full-frame design did exactly what I hoped it would do. The line did not cross over the spool or get tangled.
Sometimes the best testing does not happen when everything goes according to plan. Sometimes it happens when the plan breaks down. And sometimes, you are lucky enough to be near good water, good friends, and fish willing to teach.
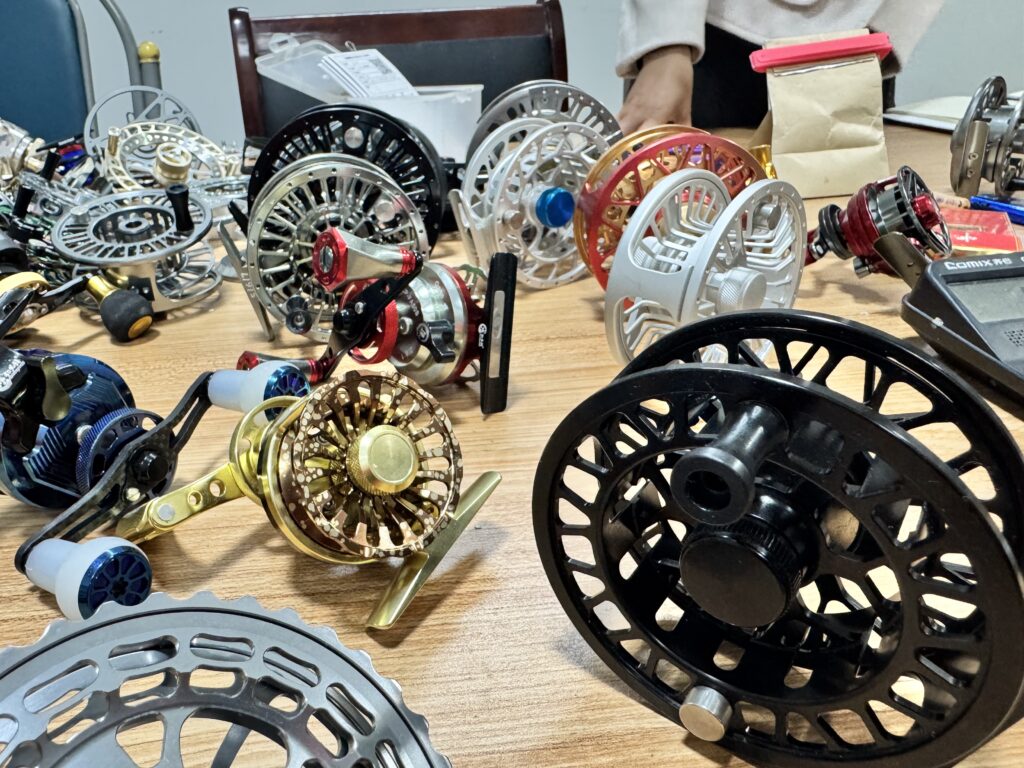
As I spent more time developing the euro nymphing reel, I began to see that the frame system already reveals a lot about what a reel is meant to do. At first glance, a fly reel and a euro nymphing reel may seem closely related. Both hold line. Both balance the rod. Both can have a smooth drag. But the deeper I looked, the more I realized they are built around different priorities.
A standard fly reel is usually designed as a more general-purpose tool. It often needs to carry a full fly line, backing, and handle a wider range of situations. Because of that, the frame and spool are designed with versatility in mind. Many fly reels use a more open cage or half-frame design. They feel light, clean, and simple, and for standard fly line systems that often works very well.
In euro nymphing, the reel is not really built around storing a bulky fly line or fighting fish on long runs off the reel. Instead, it is built around a narrower purpose: balancing a long rod, managing very thin line, picking up line quickly, and protecting fine tippet. Once I understood that, the frame design began to make much more sense.
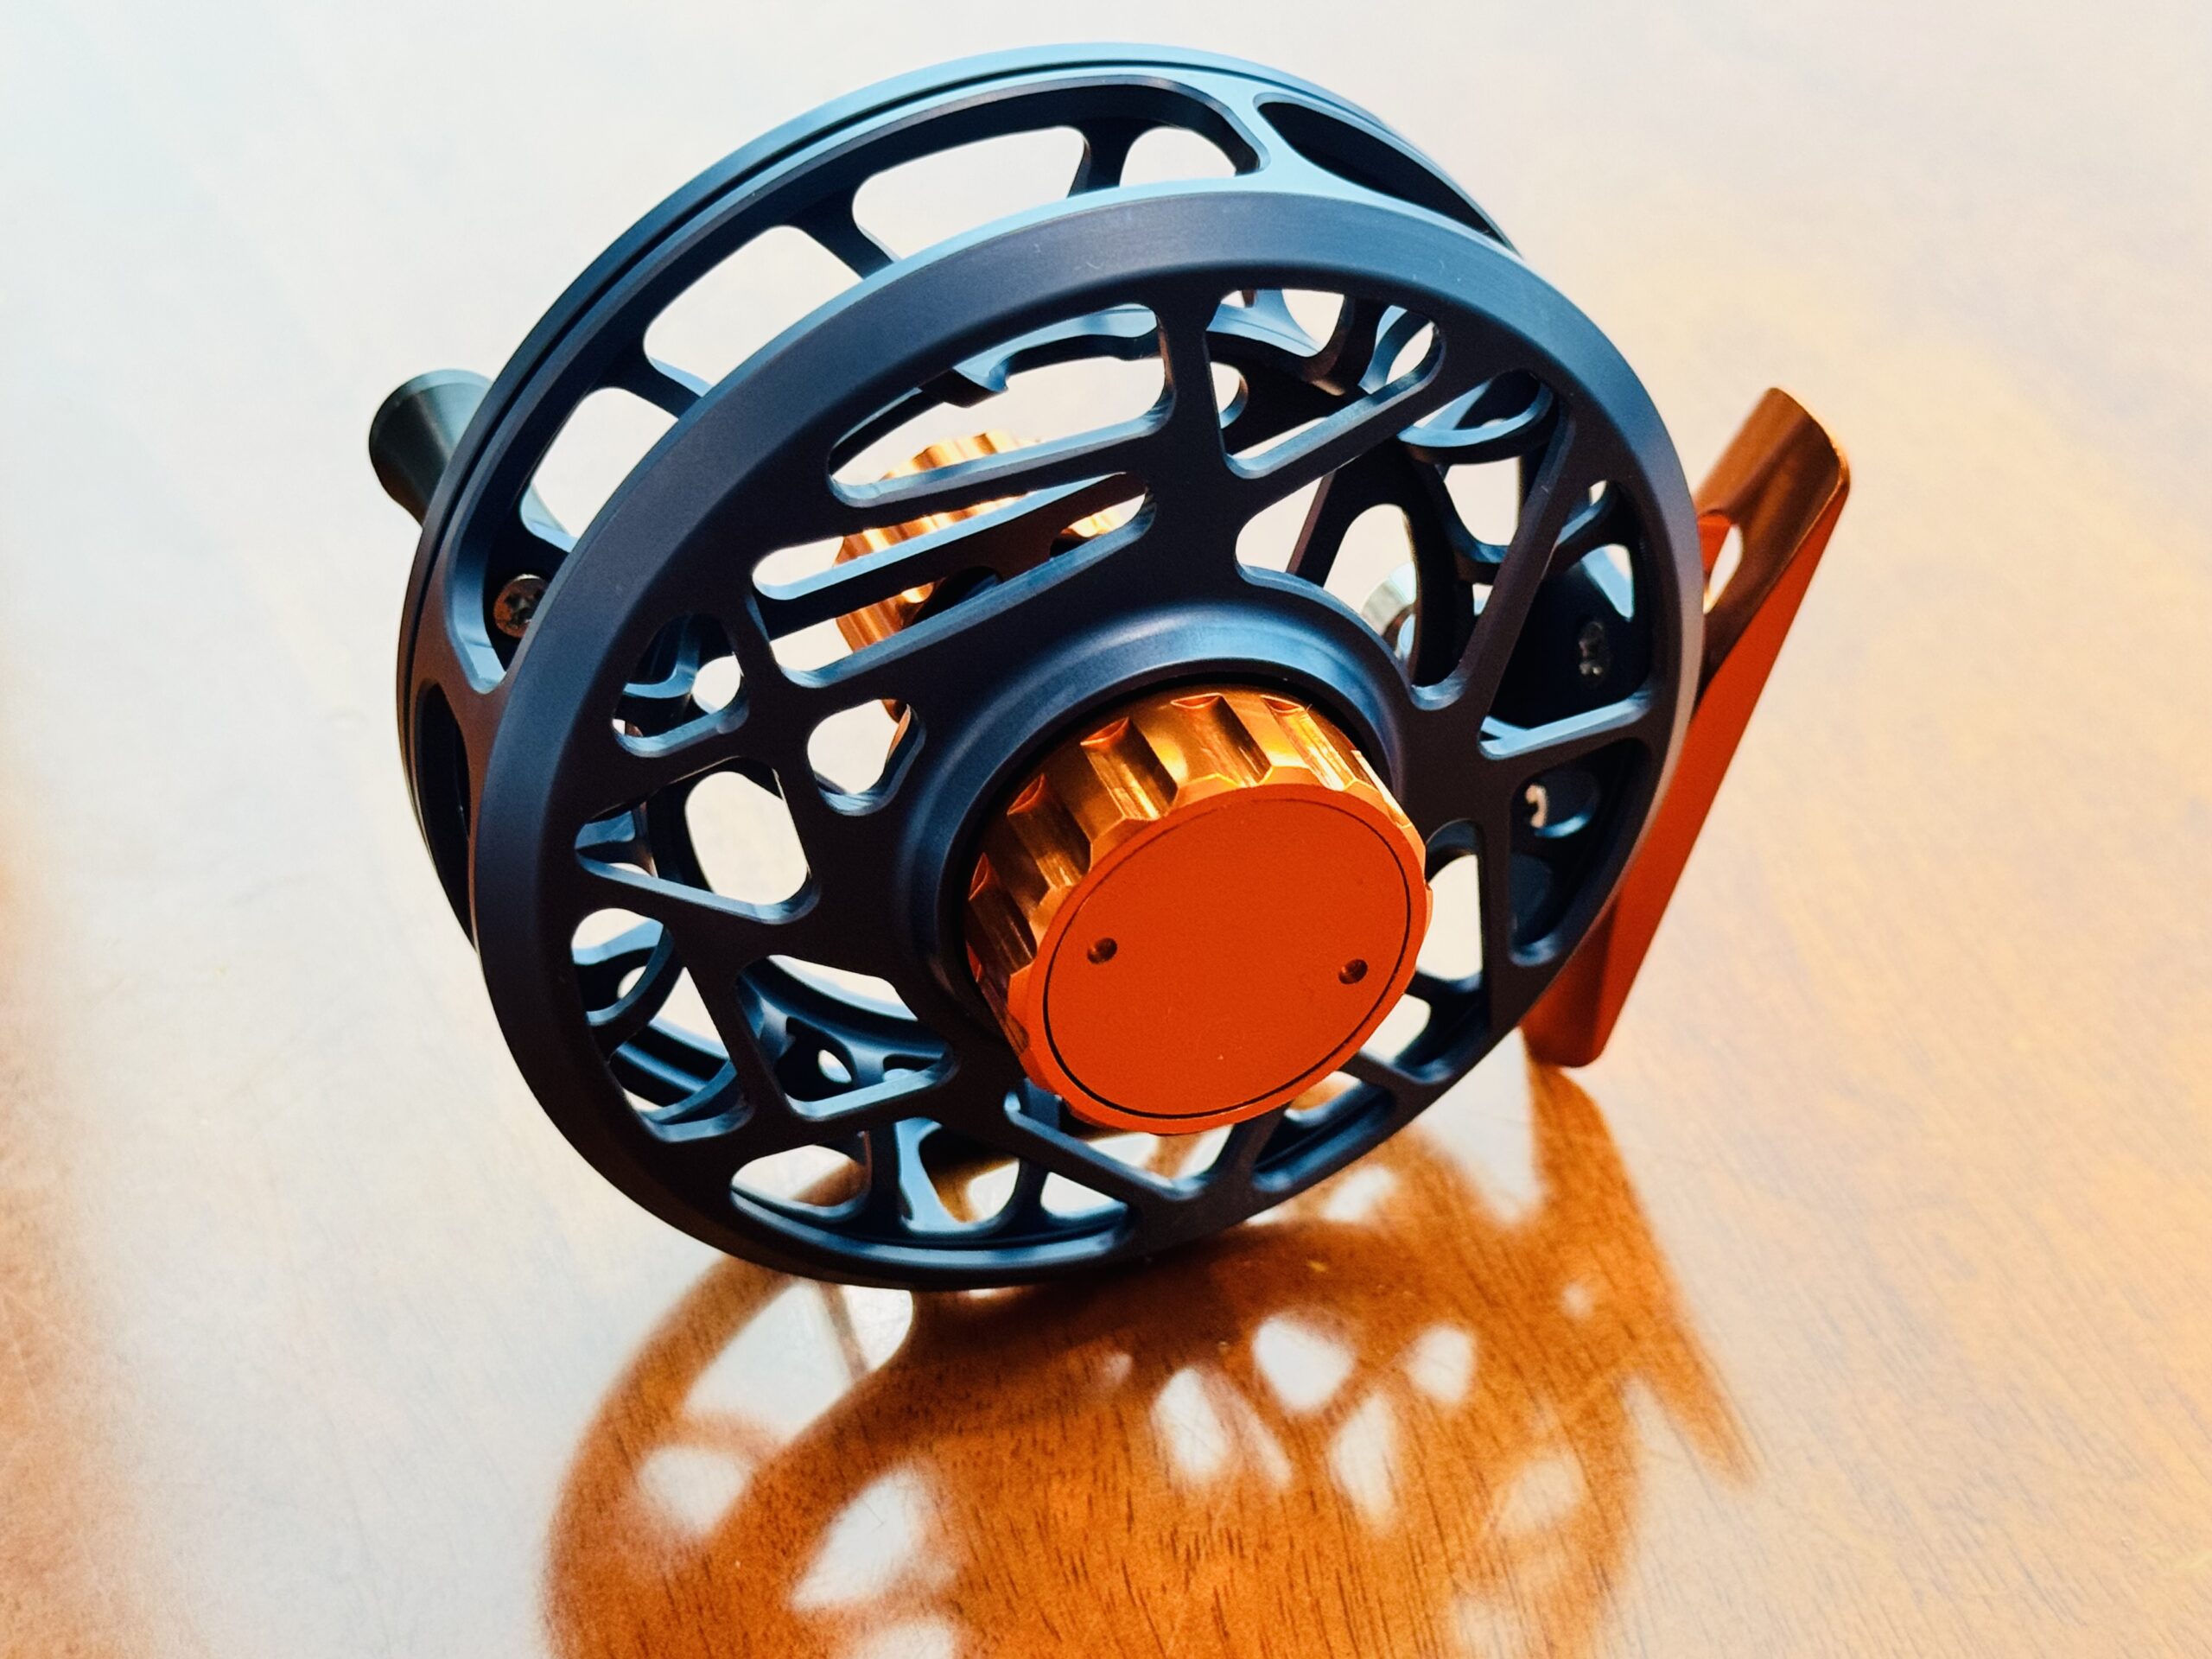
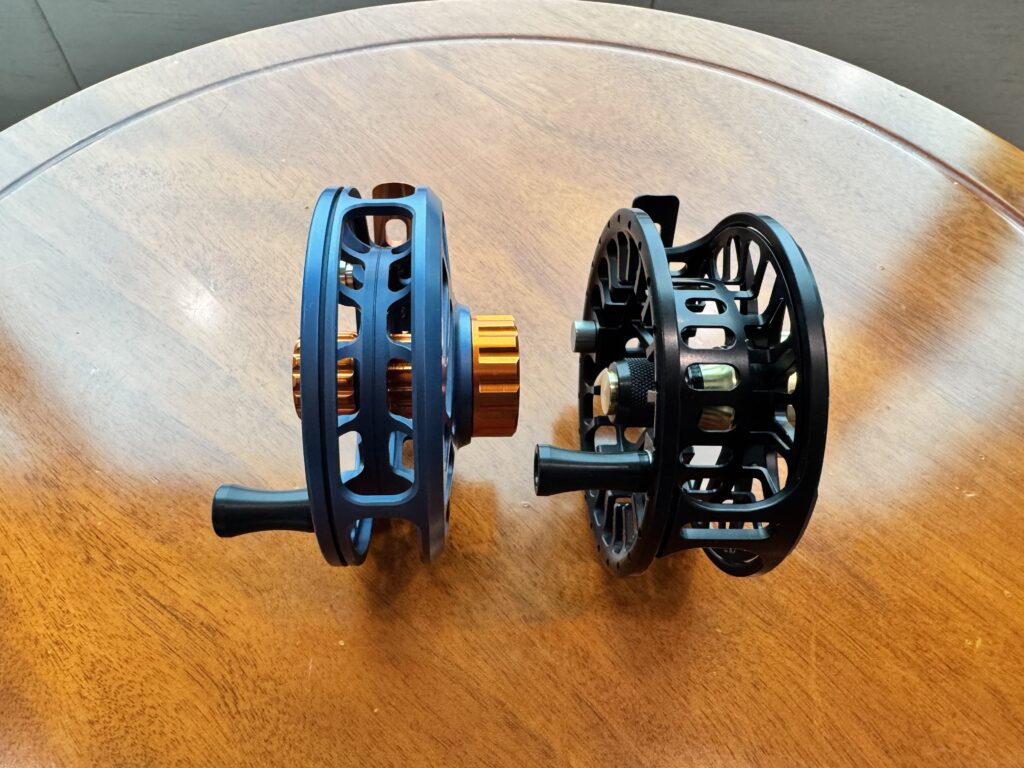
Left: Tanuki Euro Nymphing Reel with narrow spool and large arbor. Right: standard fly reel with wider spool for traditional fly line and backing
One of the first things that stood out to me was the full frame. Compared to a more open fly reel, a euro reel often feels more enclosed. That is not just a style choice. It serves a very practical purpose. Euro nymphing often uses very thin leaders, mono rigs, or thin running lines, and those can slip through wider frame gaps more easily than standard fly line. A full frame helps prevent that. It keeps the line contained and makes the reel better suited to the method.
Then there is the spool shape.
A standard fly reel often has a wider spool because it needs room for a full fly line and backing. A euro nymphing reel usually does not need that kind of line capacity. Because of that, the spool can be made narrower. The narrow spool keeps the reel more compact and helps line stack in a cleaner, more controlled way. The more I looked at it, the more I saw that this was not about making the reel different just for the sake of being different. It was about removing unnecessary bulk and shaping the reel around what euro nymphing actually needs.
At the same time, many euro reels use a large arbor and a wider overall diameter. That also follows the logic of the method. A large arbor helps pick up line faster, reduces coiling in thin line systems, and supports the reel’s role in balancing longer rods. In euro nymphing, balance matters a great deal. The reel is not simply a storage device. It becomes part of the handling character of the entire setup.
That is where I really began to see the difference.
A standard fly reel is often designed to do many things reasonably well. A euro nymphing reel is designed to do fewer things, but do them with greater focus. The full frame, narrow spool, and large arbor are all part of that specialized design language. They are not just visual features. They are practical responses to thin lines, light tippet, long rods, and the contact-driven nature of euro nymphing.
The more I studied reels, the more I came to appreciate that the frame system is not just about appearance. It is the outer expression of the reel’s purpose. And in euro nymphing, that purpose is different enough from standard fly fishing that the reel begins to take on a very different form of its own.
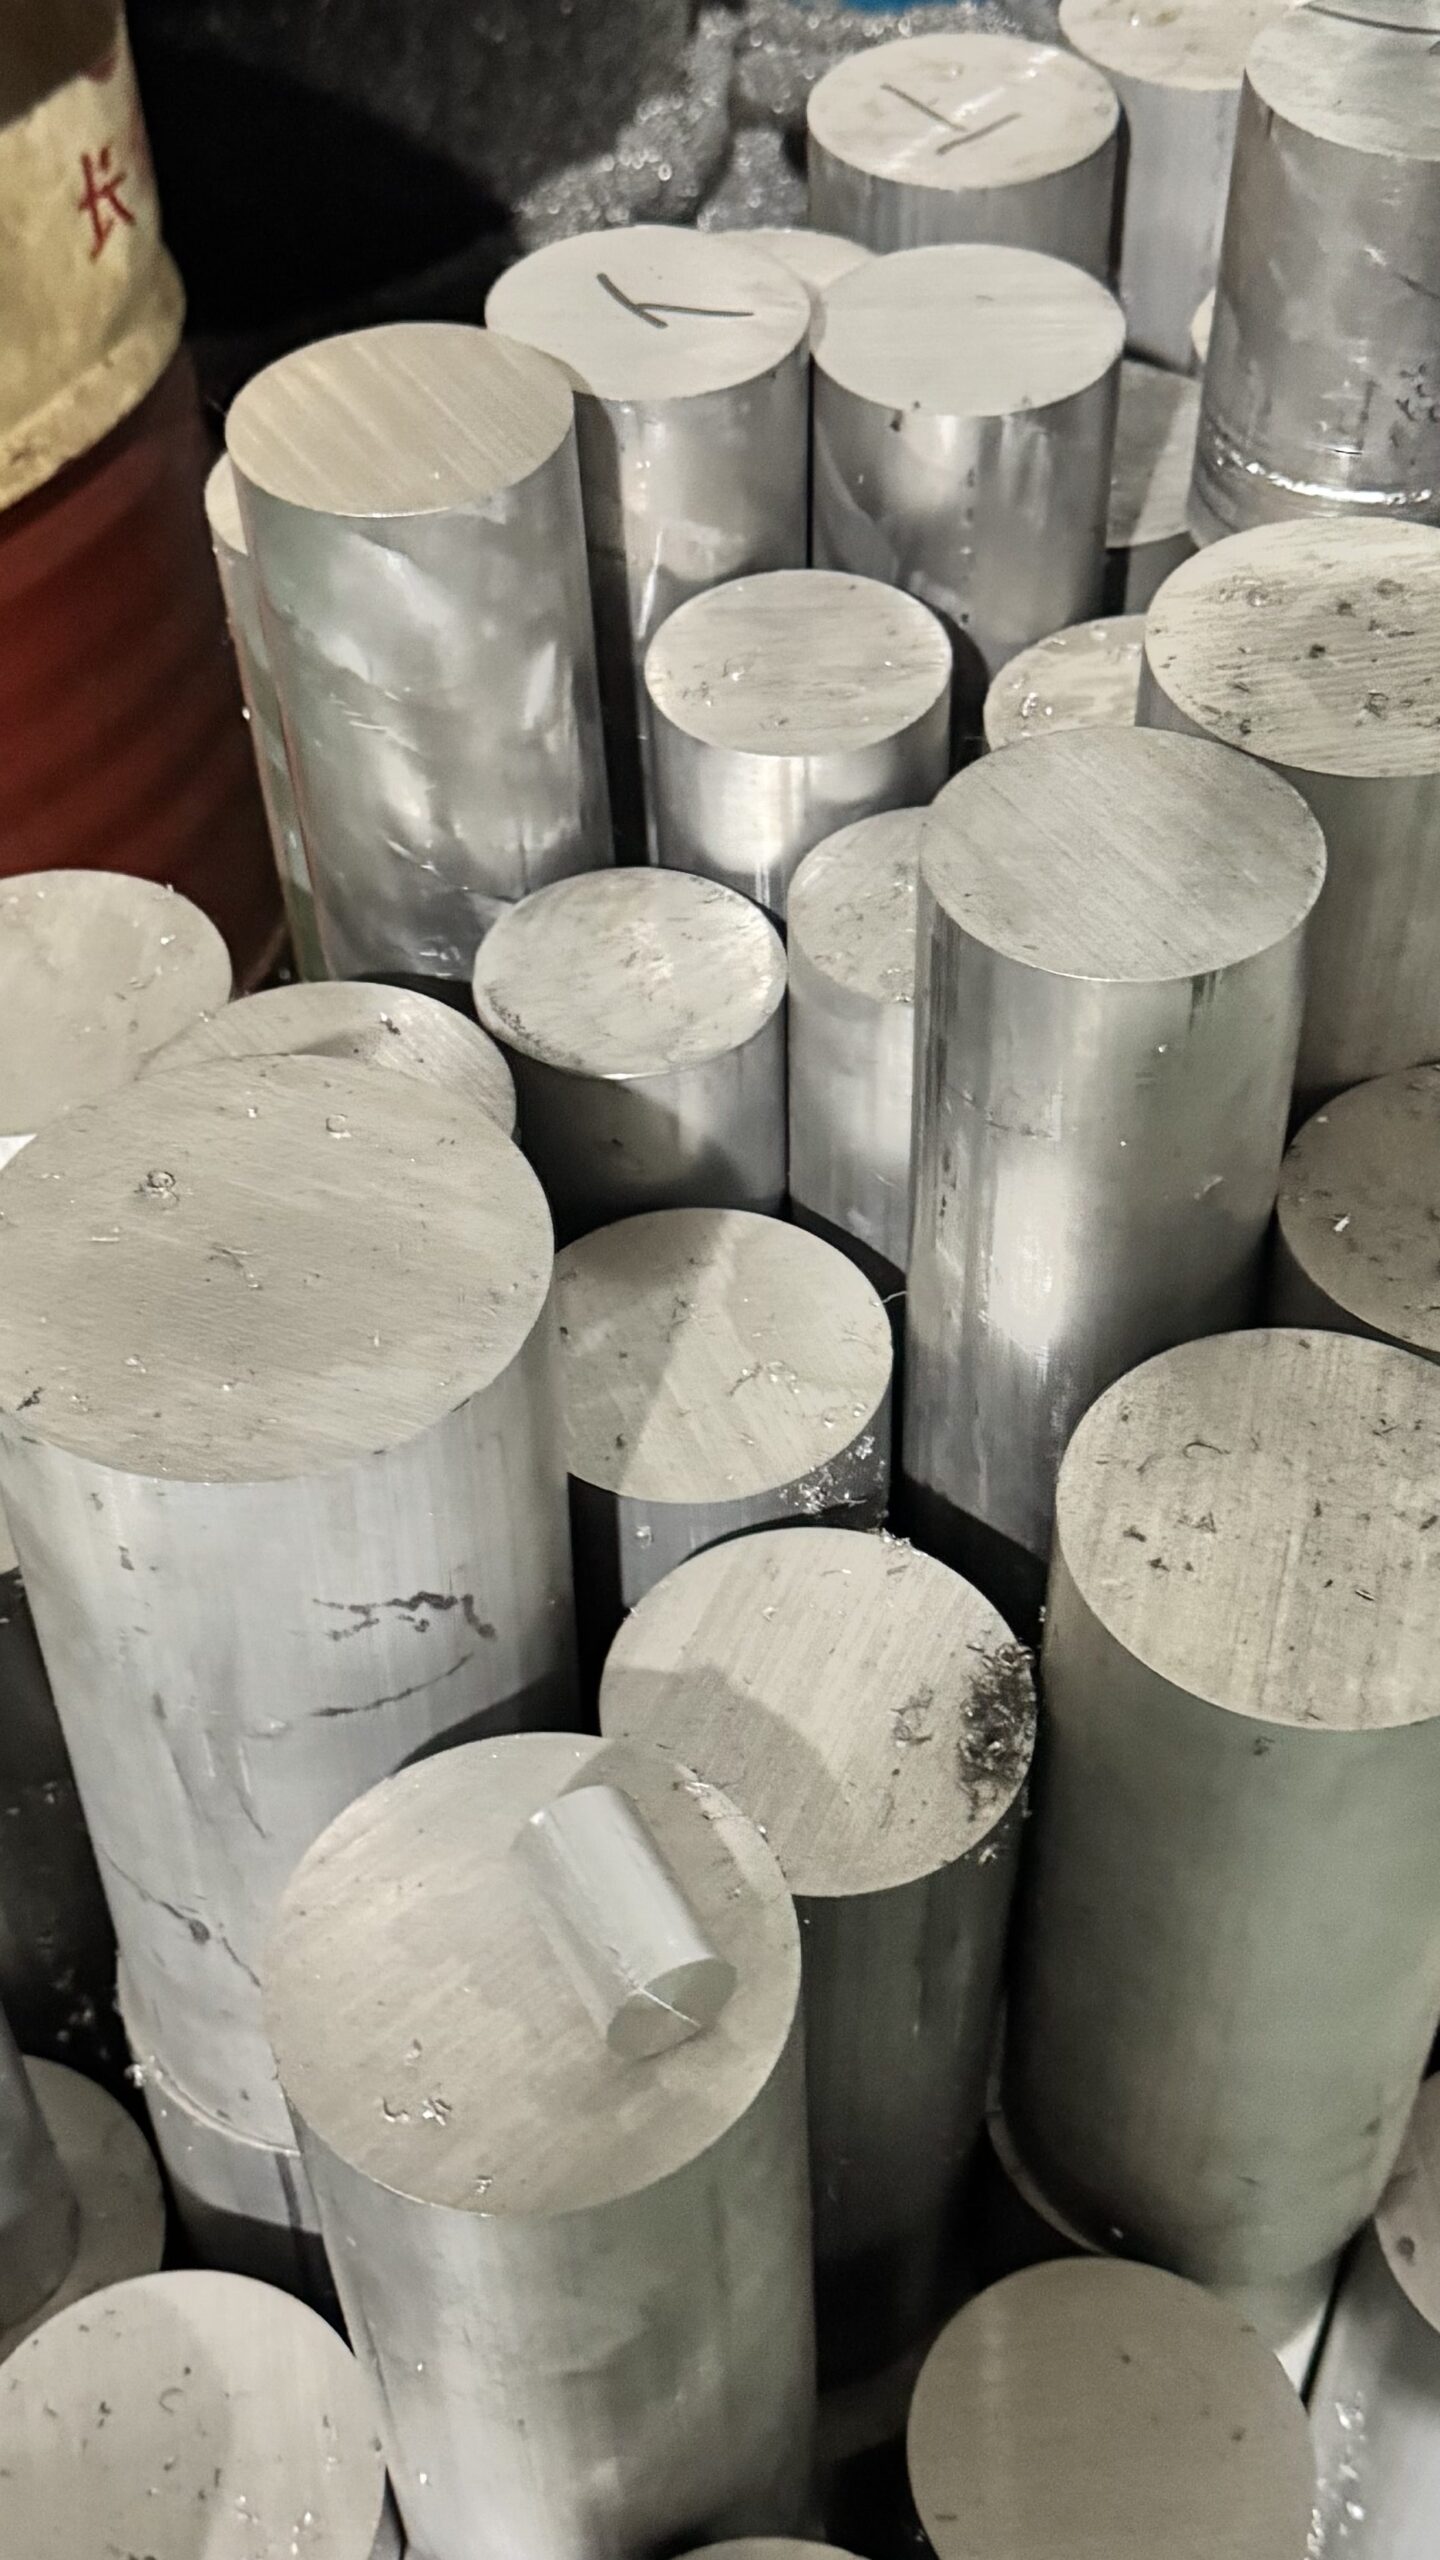
Today, the frame is typically machined from solid bar-stock aluminum using high-end, high-precision CNC milling. During my visit, I was told that each of these machines can cost around half a million U.S. dollars. That gave me a better sense of the level of investment behind modern reel manufacturing. In the early days, many Chinese manufacturers handled Type I anodizing in-house. Today, because of stricter environmental regulations, that process is often outsourced to specialized facilities.
At first, I wanted to use a Type III anodized finish because it gives the reel a harder and more durable outer skin. But for the first version of the Tanuki reel, the manufacturer recommended Type II anodizing, since it remains the most common and practical finish for this style of reel. For that first version, I also chose 6061-T6 aluminum and a carbon fiber disc drag.
Some anglers still prefer cork drag systems over carbon fiber, and that opens up a different conversation altogether. In the next post, I will take a deeper look at reel drag systems and the differences between cork and carbon fiber.
After releasing my first euro nymphing rod prototypes, I took several of them to Europe for testing last year. During that trip, and even more after I returned home, I began hearing the same question from testers in both Europe and the United States:
Would I also develop a euro nymphing reel?
That question stayed with me.
At first, I was not sure I wanted to take on another big project. Rod design already demands a great deal of time, patience, and attention. But the more I thought about it, the more curious I became. In the end, I decided to take a stab at it and see what I could do.
Learning from a Friend
As I began thinking more seriously about the reel, I reached out to my friend Gianluca Bonomi, co-owner of Like a River Alps in Italy. Gianluca is deeply passionate about euro nymphing, and over the last ten years I have fished with him many times in Europe. He also introduced me to the Italian style of euro nymphing, which feels quite different from the high-stick style I first learned in the United States.
When I asked him what matters most in a euro nymphing reel, he explained it in a simple and practical way:
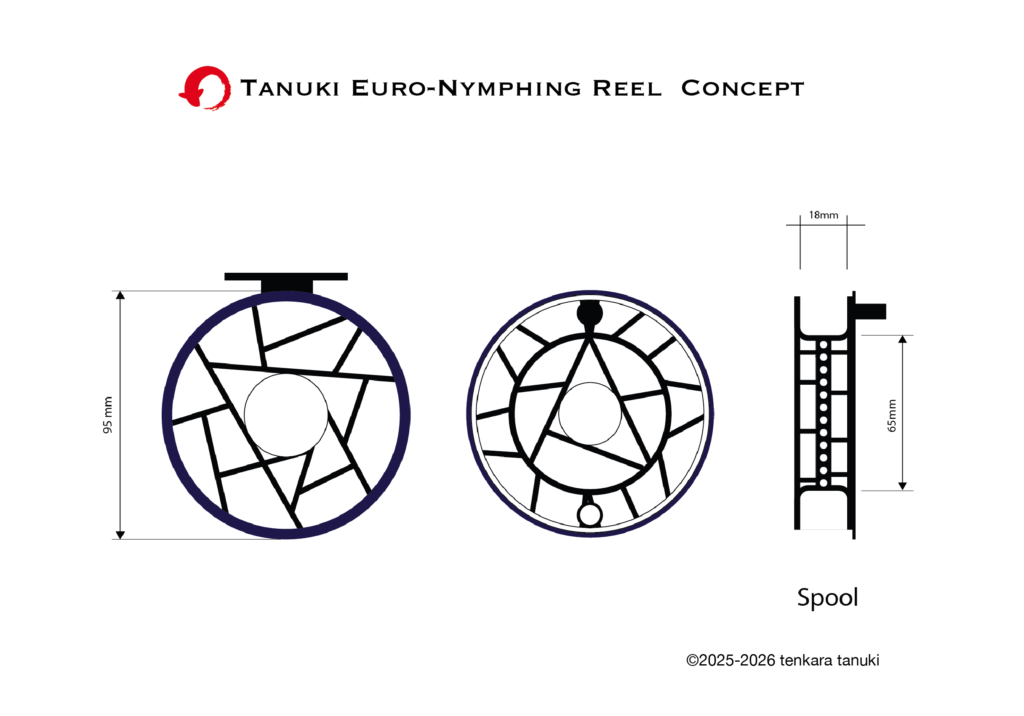
“A narrow spool is well suited to euro nymphing lines, a large arbor helps reduce line memory and coiling, and a full-frame or closed-frame design helps prevent thin line from slipping between the spool and frame.”
That gave me a very clear starting point.
My Engineering Side Took Over
Beyond spool dimensions and frame design, my engineering side was especially interested in materials, tolerances, and construction. I wasted no time diving into research, building 3D prototype models, and reaching out to reel makers in China whom I had met at the Weihai Fishing Tackle Export Show in 2024.
Before long, I realized I needed to go there in person.
I planned a trip to Ningbo to visit reel factories, discuss my ideas face-to-face, and learn directly from the engineers. Ningbo is widely recognized as one of the major centers for reel and tackle manufacturing in China, about 900 kilometers, or roughly 550 miles, from Weihai. In a way, Weihai is known more for rods, Ningbo more for reels, and between them Lianyungang is known more for fishing lines.
One thing I have learned in China is that different regions often specialize in different parts of the fishing industry. That alone taught me a great deal.
Choosing the Factories
After reviewing samples from several factories, I narrowed my choices to three companies: two in Ningbo and one in Weihai. I was excited to meet them in person and begin working directly on the design.
In my experience, it is faster and more effective to work directly with manufacturers than to communicate only online. To really control quality and refine a product, I usually need at least three trips.
The first trip is about understanding the technical specifications and the development process.
The second trip is about reviewing the prototype and making changes.
The third trip is about fine-tuning, final details, and packaging.
That process has become almost a pattern for me.
From Weihai to Ningbo
At the same time, I was already planning to fly to Weihai to continue work on a new euro nymphing rod prototype, the E2 2-weight. The E2 stands for Euro Nymphing #2, similar to the 2-weight rating used by other brands.
While waiting for the revised rod prototype, I flew into Hangzhou and then took a taxi to Ningbo. The ride was about an hour and a half. Hangzhou airport is huge, so I stayed overnight at a nearby hotel. Around 7:30AM the next morning, the factory picked us up. From there, it was another two-hour drive.
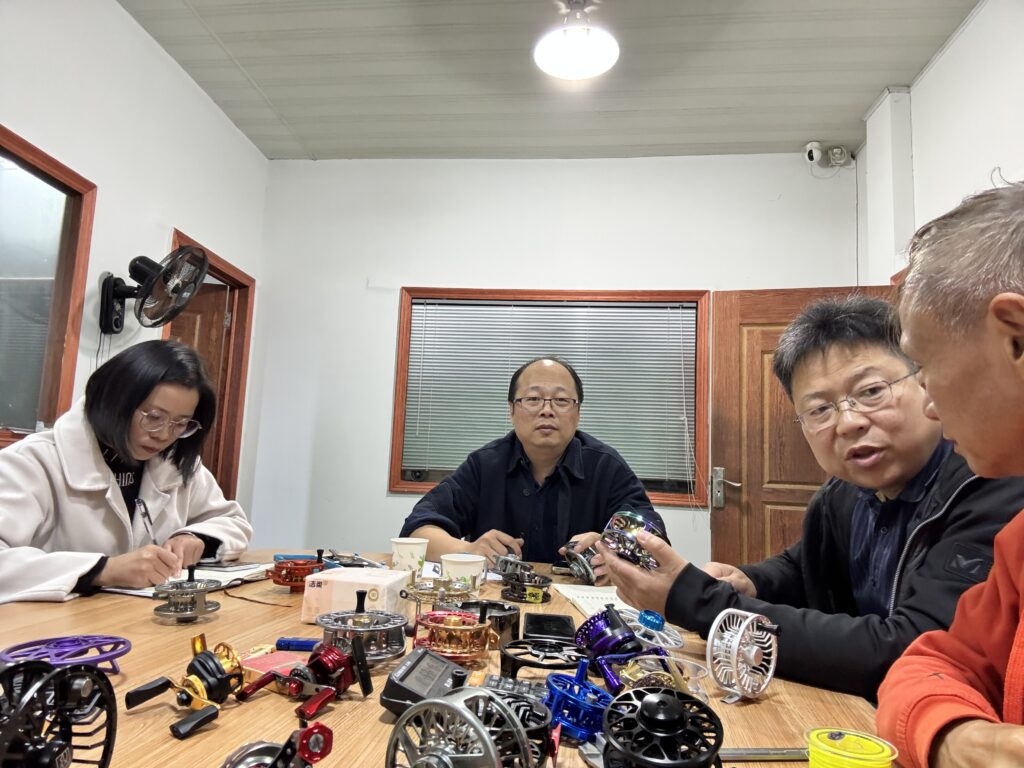
When we arrived, we started working almost immediately.
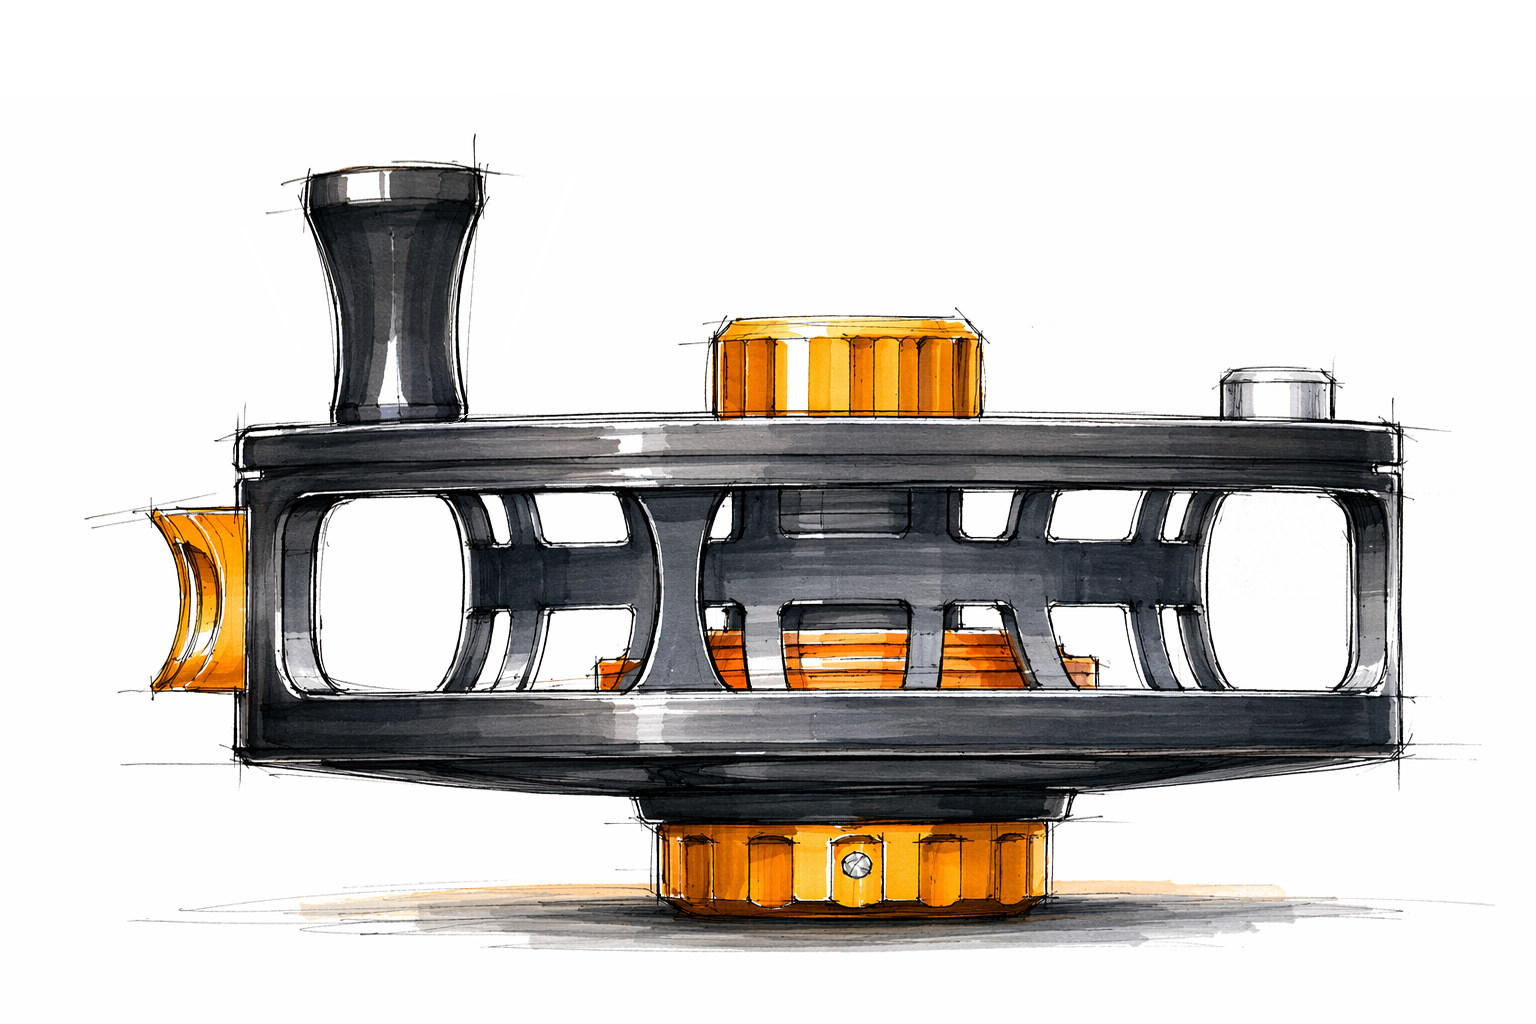
After a quick inspection of the facility, I sat down with the owner, who was also the chief engineer, and we began working directly on the 3D model together. By lunchtime, we already had a strong concept taking shape. We kept refining it late into the evening.
By the time I got back to the hotel, all the restaurants were closed.
Luckily, the hotel sold instant noodles.
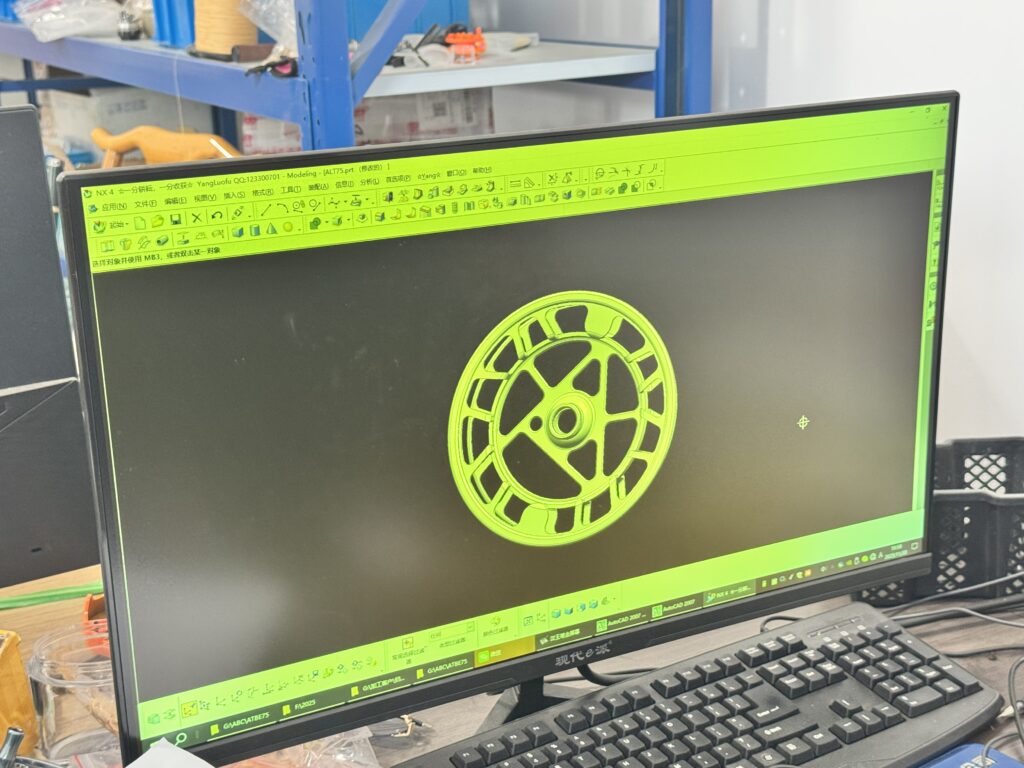
The Details Changed Everything
The engineer and I spent another ten days fine-tuning the 3D model online. As always, the devil was in the details. Small changes in dimensions, tolerances, spool shape, frame clearance, and drag layout all mattered more than they seemed at first.
That part reminded me of rod design.
From the outside, people often see only the finished product. What they do not see is how much thought goes into every small choice, or how many adjustments it takes before something finally feels right.
By then, I thought I had already learned a lot about reel development. But the deeper I got into it, the more I realized I was still learning every day.
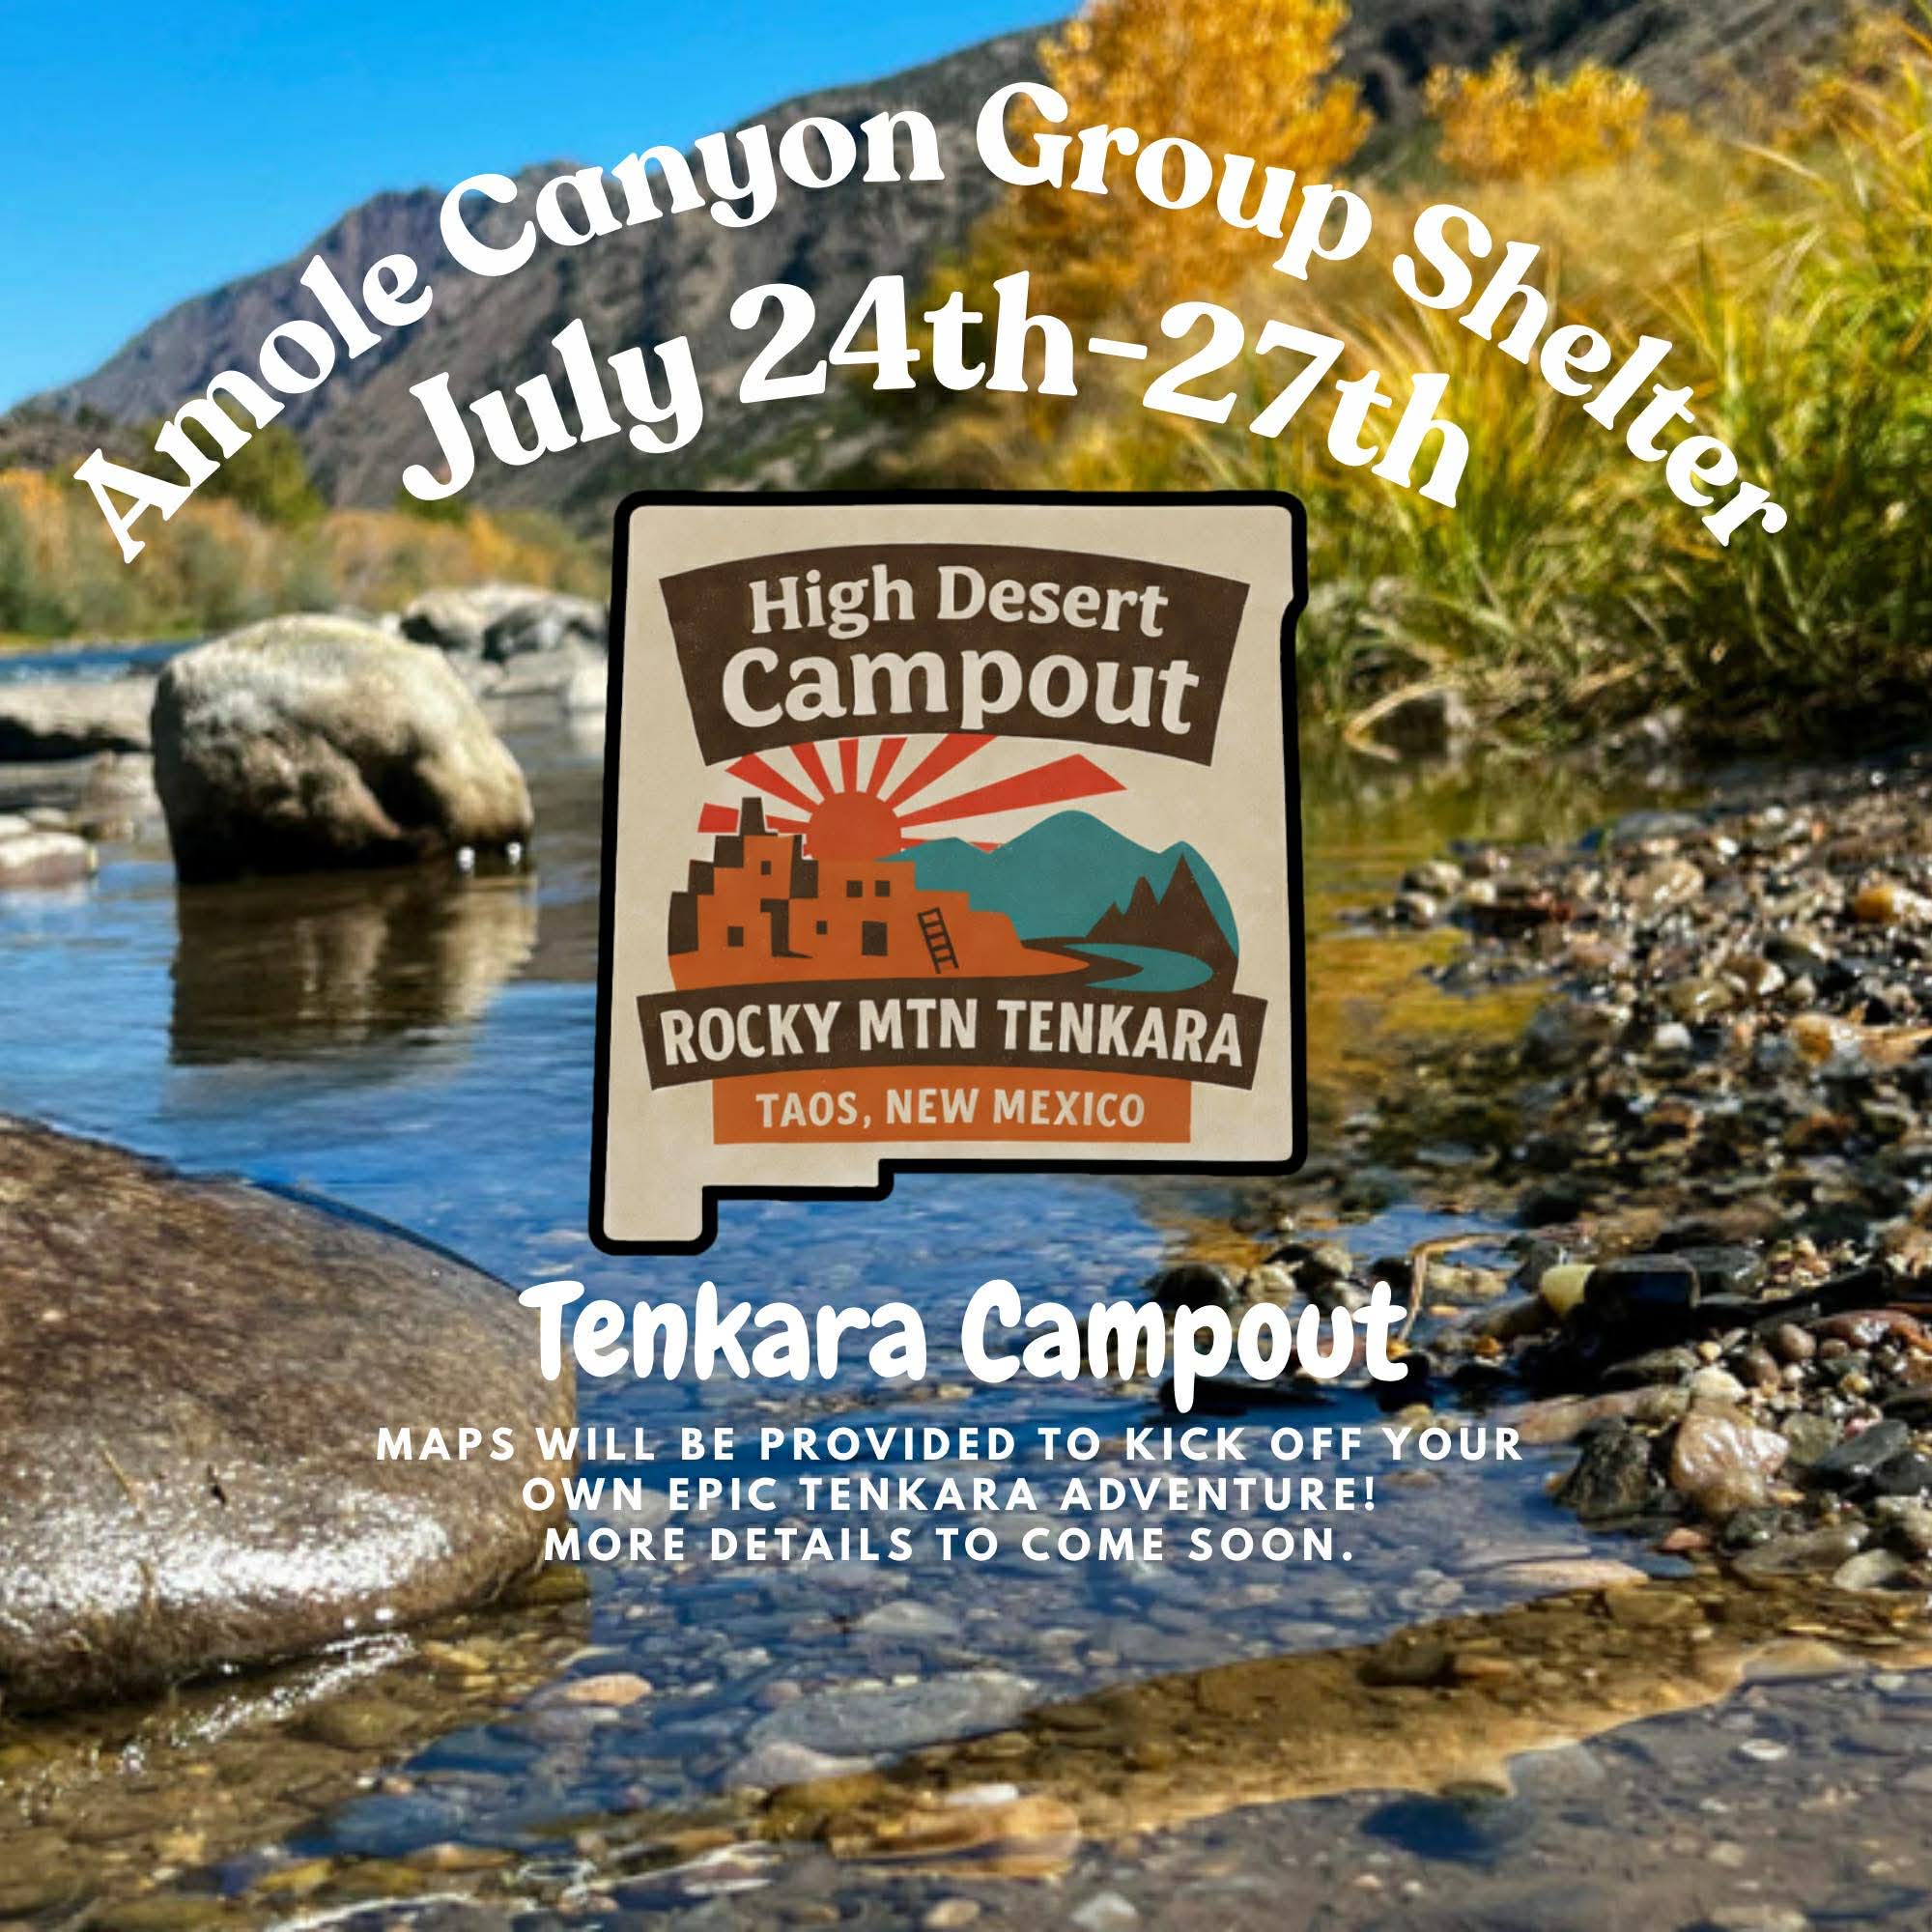
This will be the very first Tenkara Campout hosted by Rocky MTN Tenkara here in New Mexico, and we’d love to extend our backyard to any angler willing to make the trip. The campout will take place about 15 miles outside of Taos, surrounded by some of the best small-stream fishing in the region.
We chose this campground because it can comfortably accommodate up to 100 people and 30 vehicles, with outhouse facilities available on site. Its location also offers the convenience of being close to Taos, so if dry camping with the group isn’t quite your style, there are plenty of nearby lodging options.
The event will begin on Friday, July 24th, and run through Monday, July 27th, when we’ll wrap up with final cleanup and check-out. This is a free event (donations welcome) for anyone willing to make the trek to New Mexico and help us kick off our first Rocky MTN Tenkara campout.
This will be a “choose your own adventure” style Tenkara trip, with access to countless blue line streams as well as larger waters like the Rio Grande Box perfect for anglers looking for anything from an easy day on the water to a more adventurous hike in experience.
We’ll also be providing downloadable maps on our website, along with local fishing information to help you explore the area and make the most of your time in Northern New Mexico.
We’d also like to gather in the evenings after a full day on the water to talk shop, share stories, and swap a few after-action reports with fellow anglers.